> ## Documentation Index
> Fetch the complete documentation index at: https://portkey-docs-agentcore.mintlify.site/llms.txt
> Use this file to discover all available pages before exploring further.
# Open WebUI
> Enterprise-grade cost tracking, observability, and more for Open WebUI
For IT teams running centralized OpenWebUI deployments, Portkey brings enterprise-grade observability and governance. Get unified model management, automatic cost tracking, and per-user attribution across all your LLM providers.
# Understanding the Integration Paths
When implementing Portkey with OpenWebUI you can choose between two complementary approaches:
1. **Direct OpenAI-compatible connection** – ideal if you already rely on Portkey's Model Catalog and simply need to expose those models inside OpenWebUI.
2. **Portkey Manifold Pipe** – our official pipe unlocks richer governance, metadata, and resilience features directly within OpenWebUI.
Pick the path that matches your requirements: you can start with the API-compatible flow and graduate to the pipe whenever you need advanced controls.
If you're an individual user just looking to use Portkey with OpenWebUI, you only need to complete the workspace preparation and one of the integration options below.
## 1. Prepare Your Portkey Workspace
1. Go to the [**API Keys**](https://app.portkey.ai/api-keys) section in the Portkey sidebar.
2. Click **Create New API Key** with the permissions you plan to expose.
3. Save and copy the key — you’ll paste it into OpenWebUI.
1. Navigate to **Model Catalog → AI Providers**.
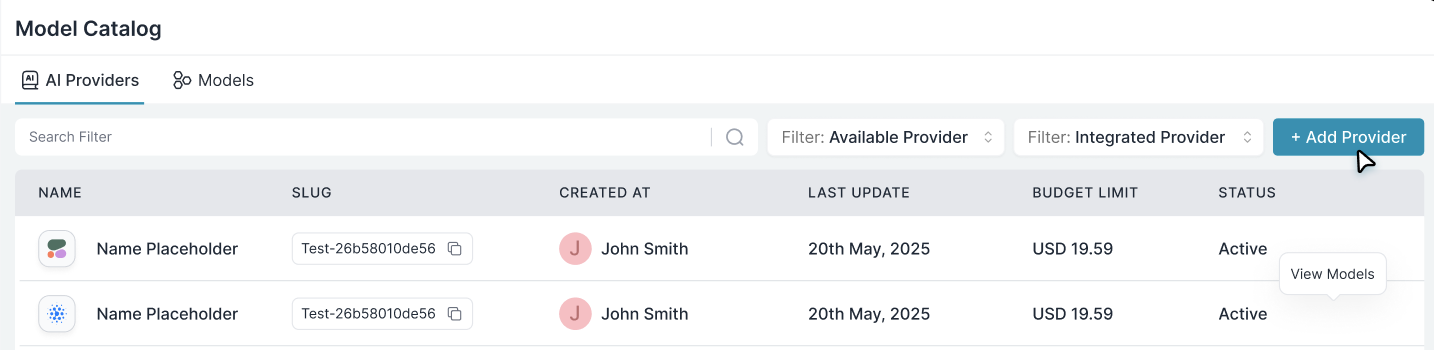 2. Click **Create Provider** (if this is your first time using Portkey).
3. Select **Create New Integration** → choose your AI service (OpenAI, Anthropic, etc.).
4. Enter your provider’s API key and required details.
5. *(Optional)* Configure workspace and model provisioning.
6. Click **Create Integration**.
1. Go to **Model Catalog → Models**.
2. Copy the slug for each model you want to use (`@provider-slug/model-name`).
2. Click **Create Provider** (if this is your first time using Portkey).
3. Select **Create New Integration** → choose your AI service (OpenAI, Anthropic, etc.).
4. Enter your provider’s API key and required details.
5. *(Optional)* Configure workspace and model provisioning.
6. Click **Create Integration**.
1. Go to **Model Catalog → Models**.
2. Copy the slug for each model you want to use (`@provider-slug/model-name`).
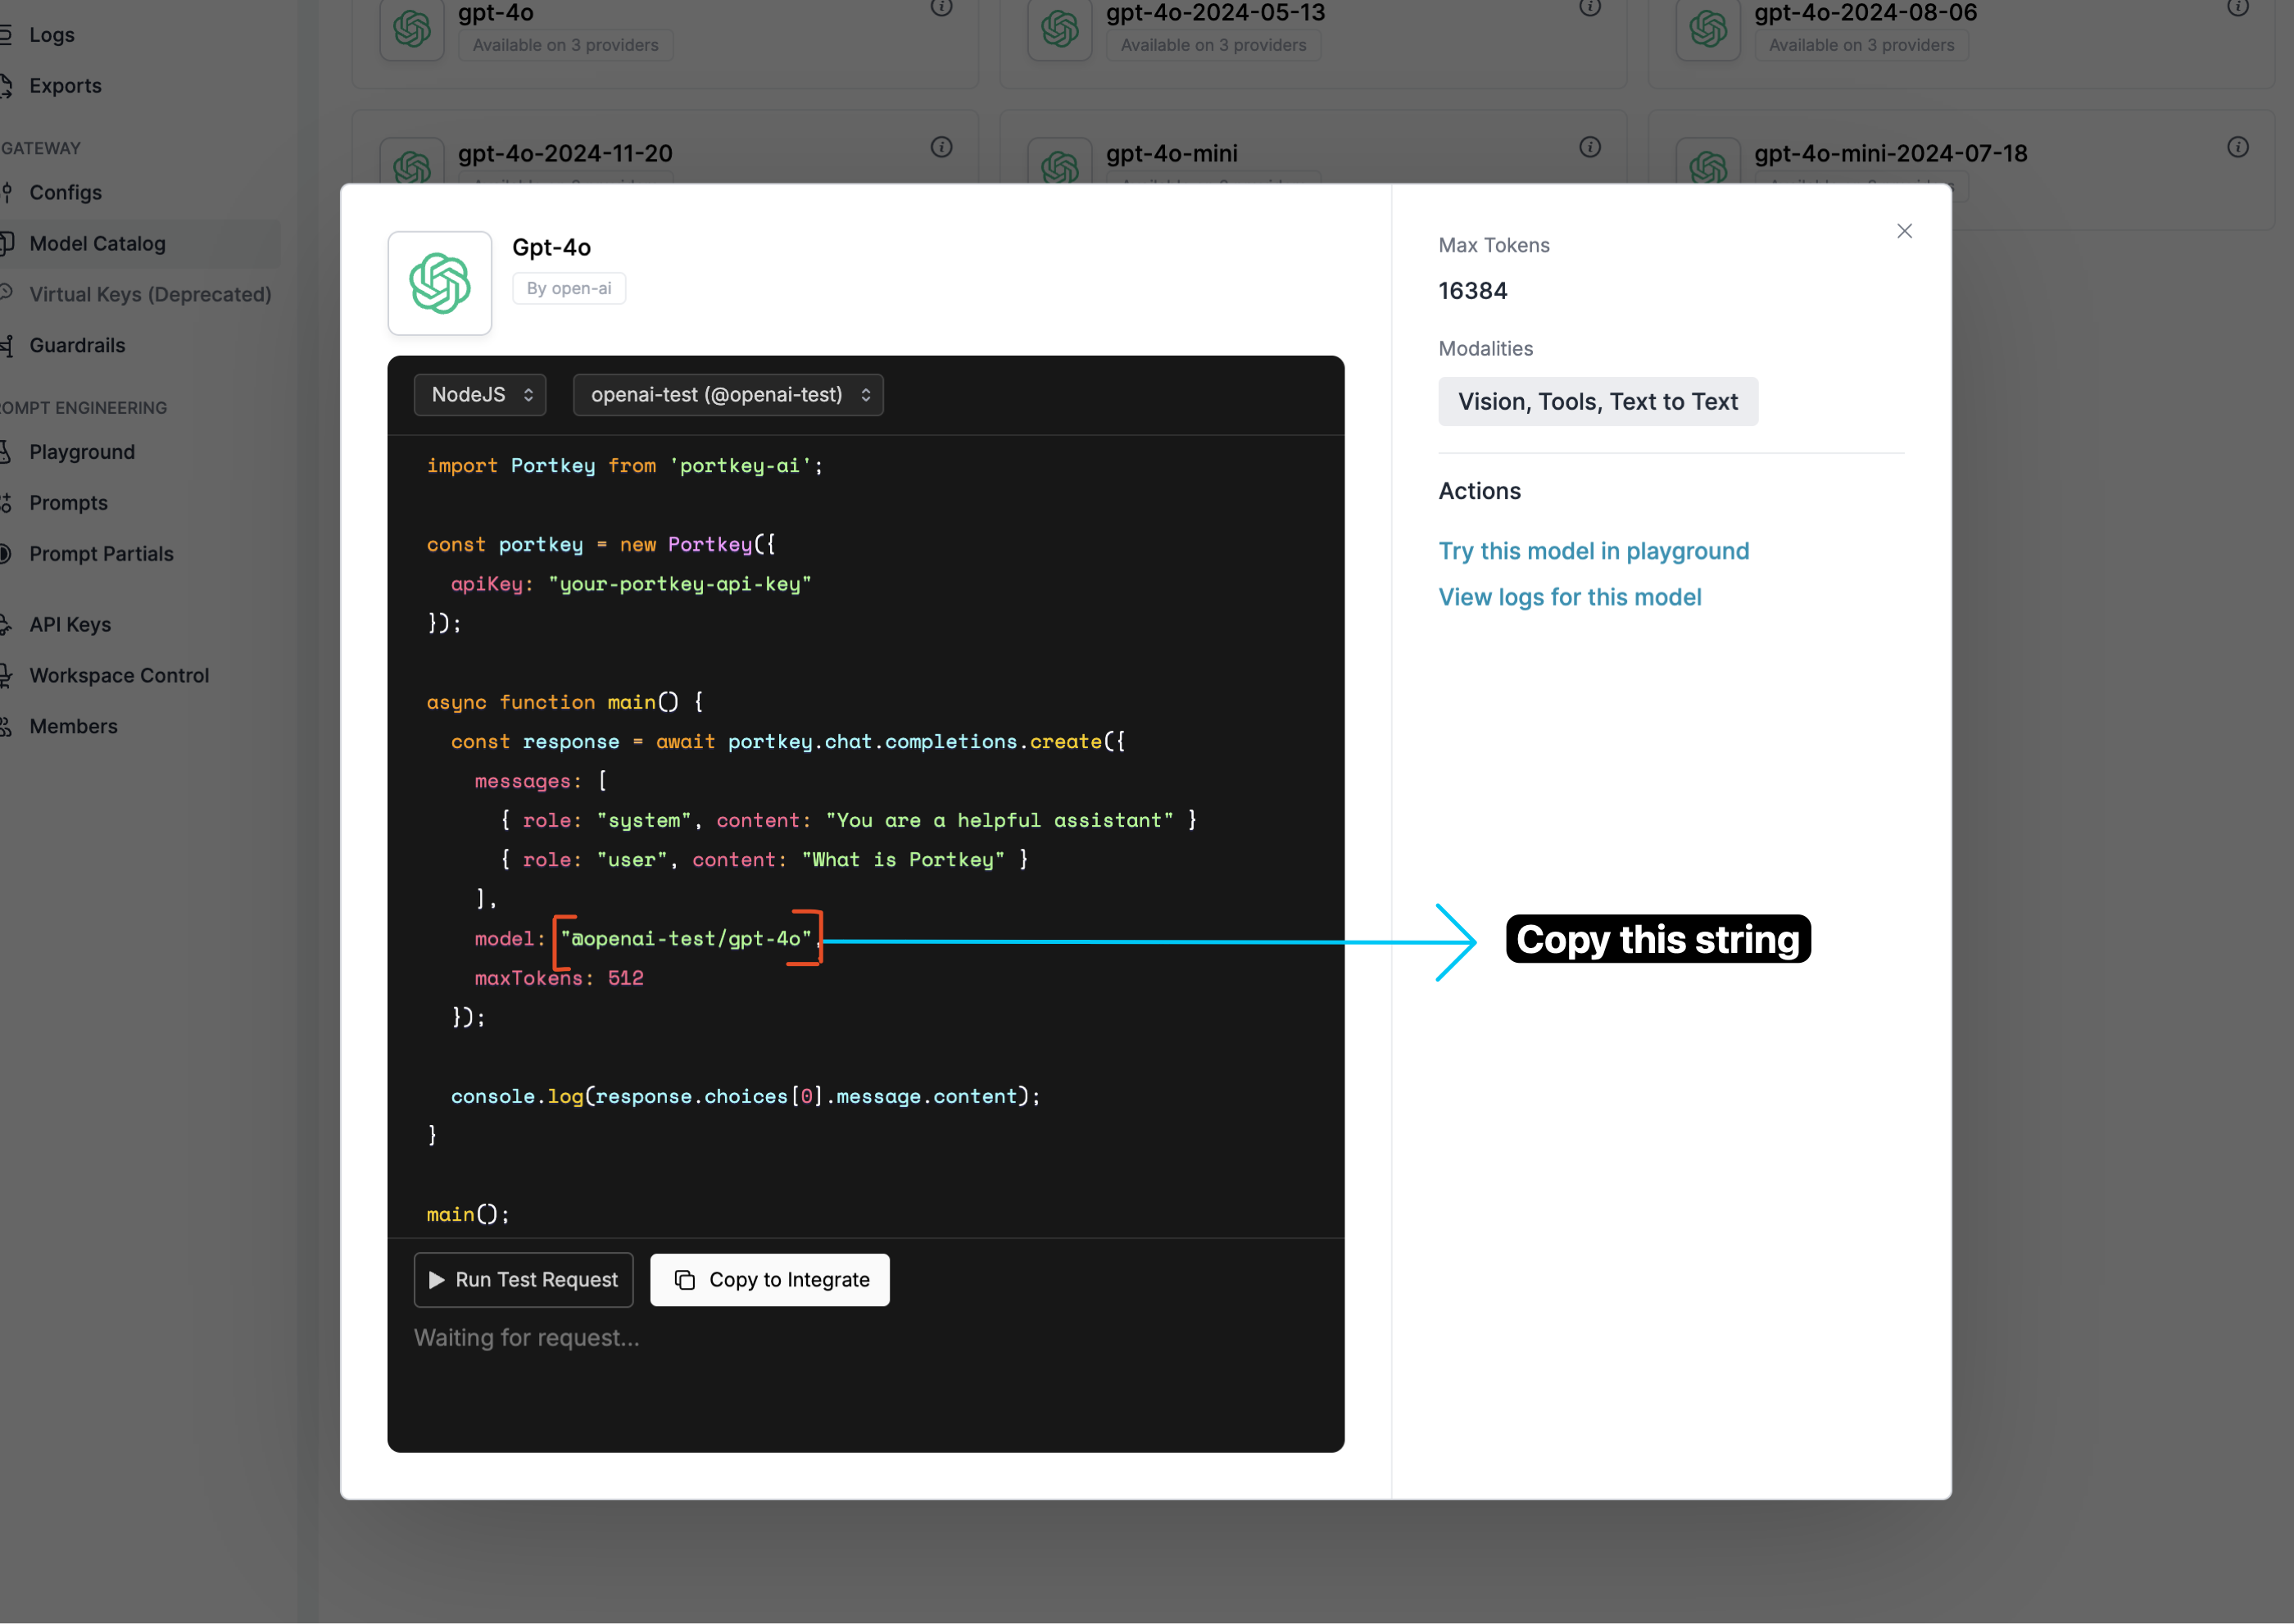 Example: `@openai-test/gpt-4o` — use this in the `model` field of API requests.
Before switching to OpenWebUI, decide whether you want to connect via the OpenAI-compatible API or use the official Portkey Manifold Pipe.
***
## 2. Connect OpenWebUI to Portkey
Choose the option that best fits your needs.
### Option A: Direct OpenAI-Compatible Connection
This route keeps your setup lightweight by pointing OpenWebUI at Portkey's OpenAI-compatible endpoint.
You’ll need the API key and model slugs collected in [Step 1](#1-prepare-your-portkey-workspace).
1. Start your OpenWebUI server.
2. Click your **username** at the bottom left.
3. Open the **Admin Panel** → **Settings** tab → select **Connections** from the sidebar.
Example: `@openai-test/gpt-4o` — use this in the `model` field of API requests.
Before switching to OpenWebUI, decide whether you want to connect via the OpenAI-compatible API or use the official Portkey Manifold Pipe.
***
## 2. Connect OpenWebUI to Portkey
Choose the option that best fits your needs.
### Option A: Direct OpenAI-Compatible Connection
This route keeps your setup lightweight by pointing OpenWebUI at Portkey's OpenAI-compatible endpoint.
You’ll need the API key and model slugs collected in [Step 1](#1-prepare-your-portkey-workspace).
1. Start your OpenWebUI server.
2. Click your **username** at the bottom left.
3. Open the **Admin Panel** → **Settings** tab → select **Connections** from the sidebar.
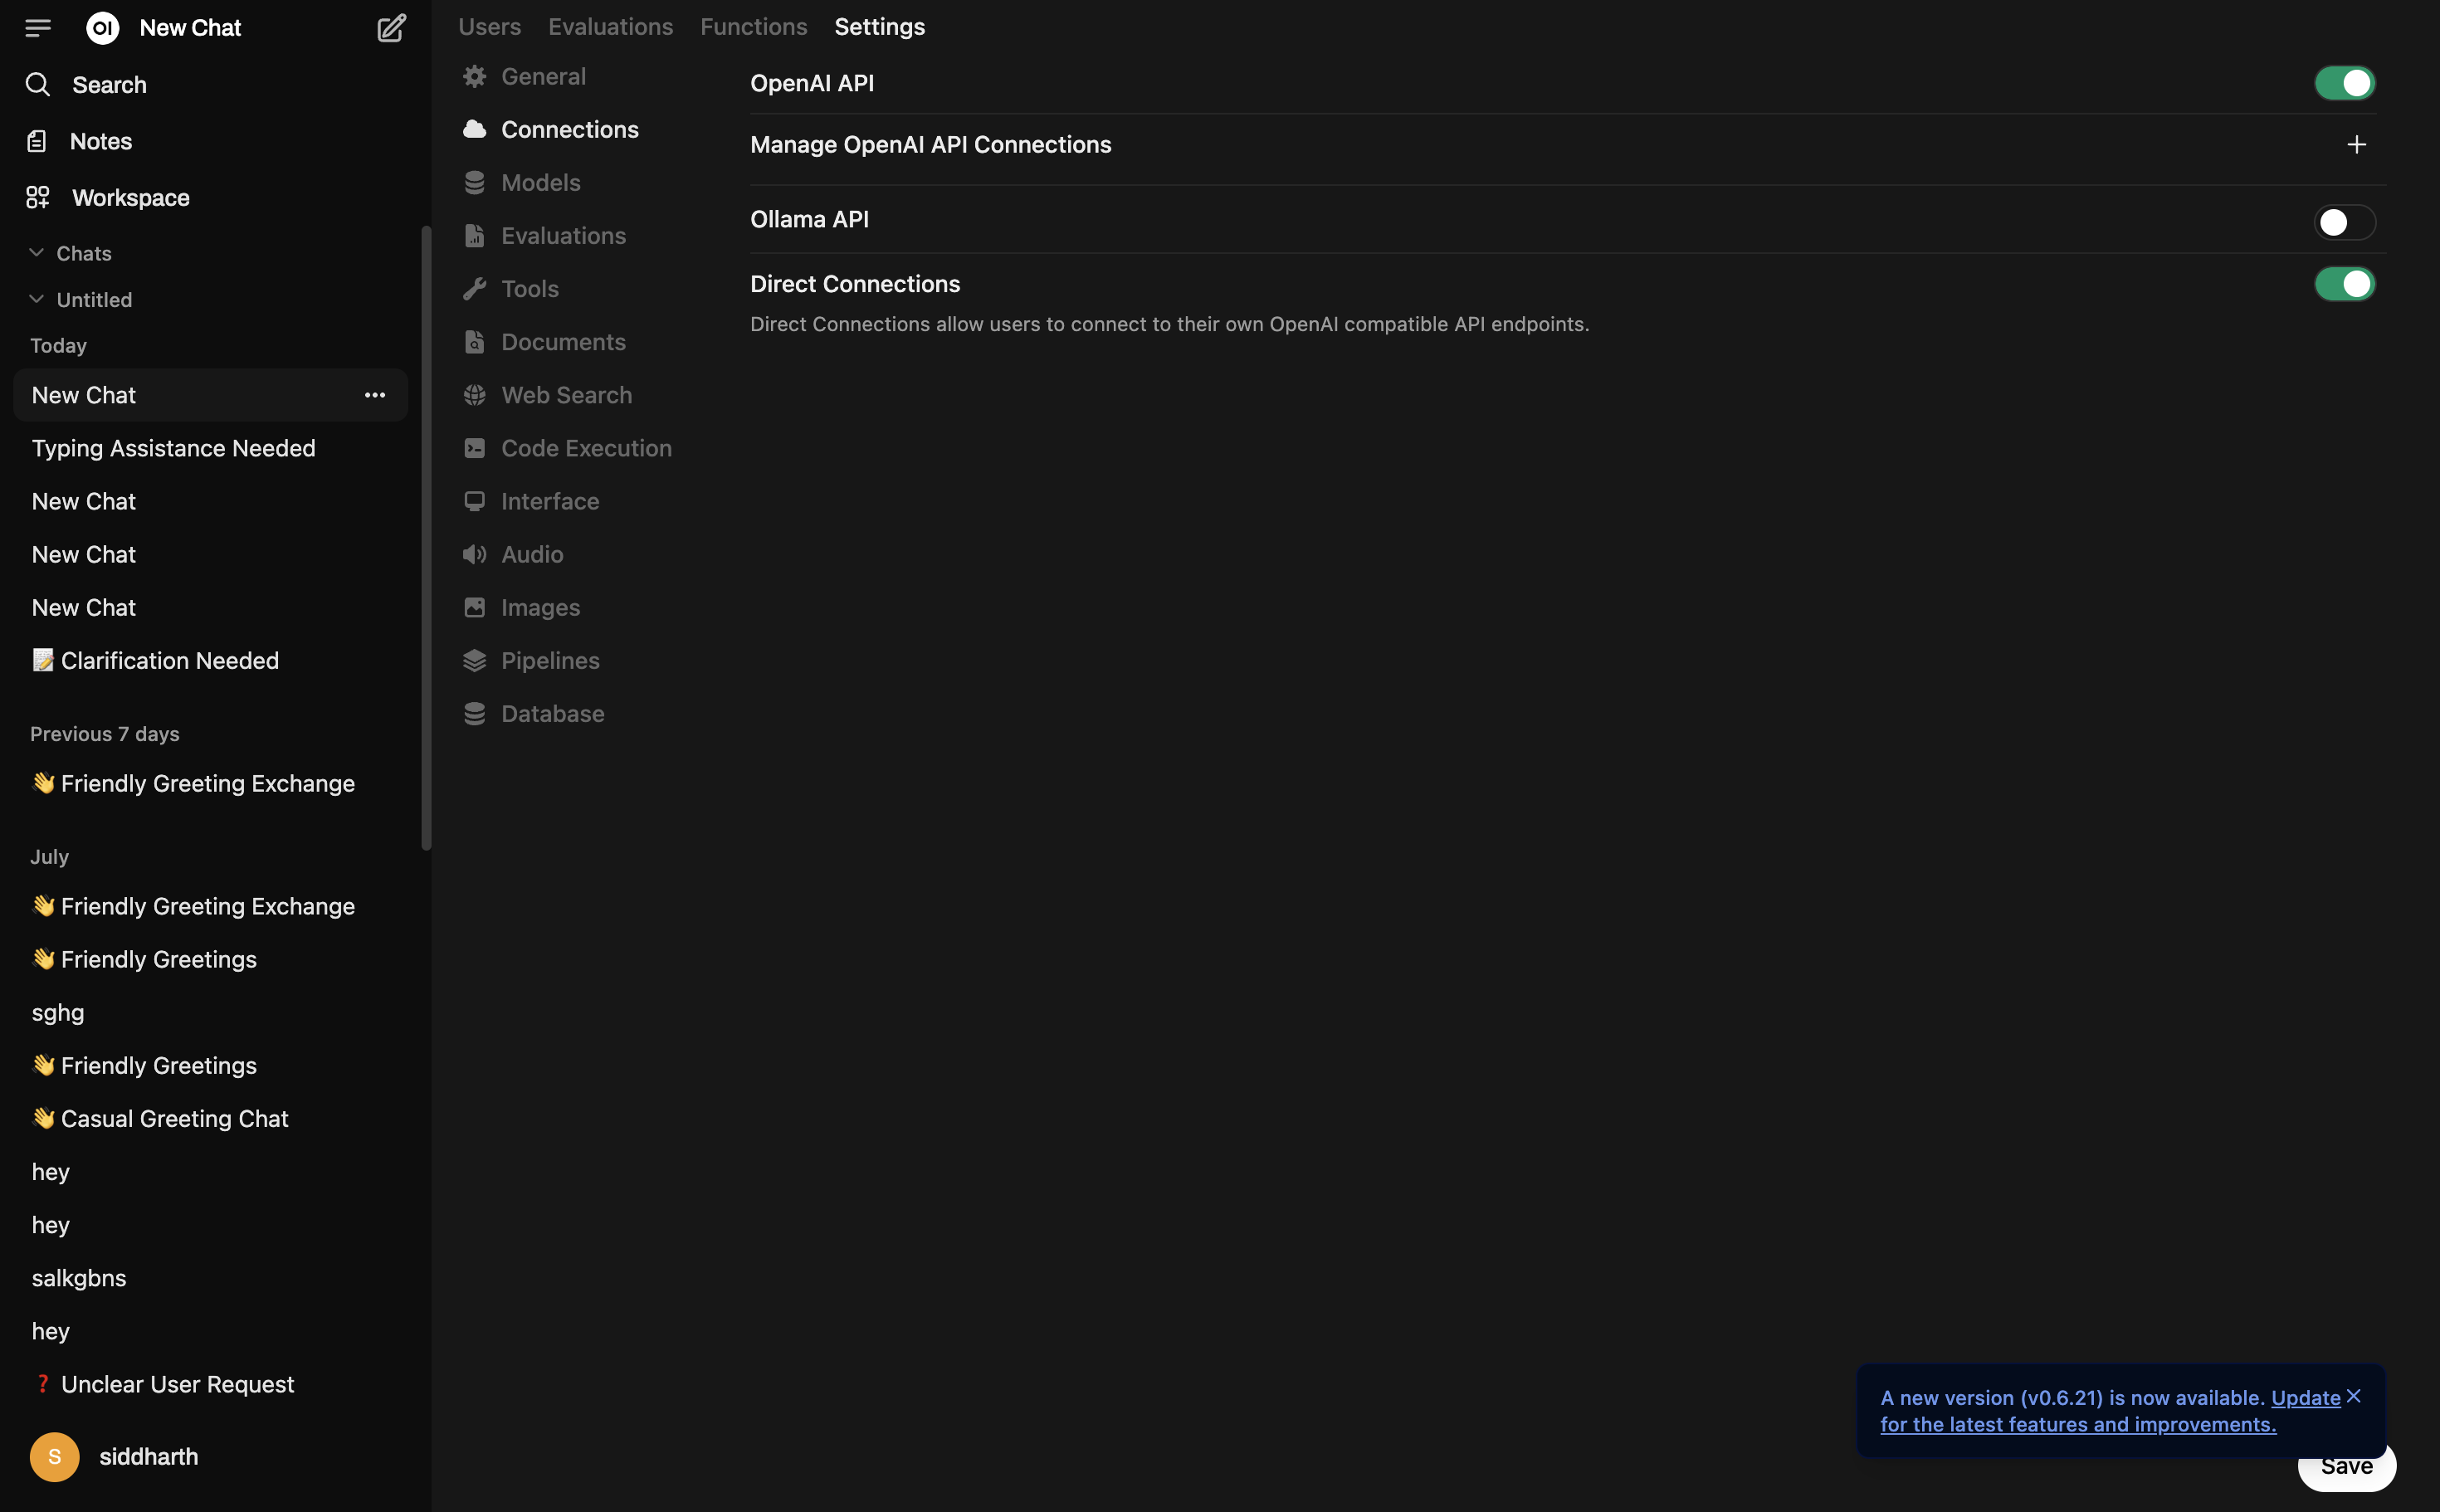 1. Turn on **Direct Connections** and the **OpenAI API** toggle.
2. Click the **+** icon next to *Manage OpenAI API Connections*.
Fill in the **Edit Connection** dialog:
* **URL**: `https://api.portkey.ai/v1`
* **Key**: Your Portkey API key
* **Prefix ID**: `portkey` (or a label you prefer)
* **Model IDs**: Slugs such as `@openai/gpt-4o` or `@anthropic/claude-3-sonnet`
1. Turn on **Direct Connections** and the **OpenAI API** toggle.
2. Click the **+** icon next to *Manage OpenAI API Connections*.
Fill in the **Edit Connection** dialog:
* **URL**: `https://api.portkey.ai/v1`
* **Key**: Your Portkey API key
* **Prefix ID**: `portkey` (or a label you prefer)
* **Model IDs**: Slugs such as `@openai/gpt-4o` or `@anthropic/claude-3-sonnet`
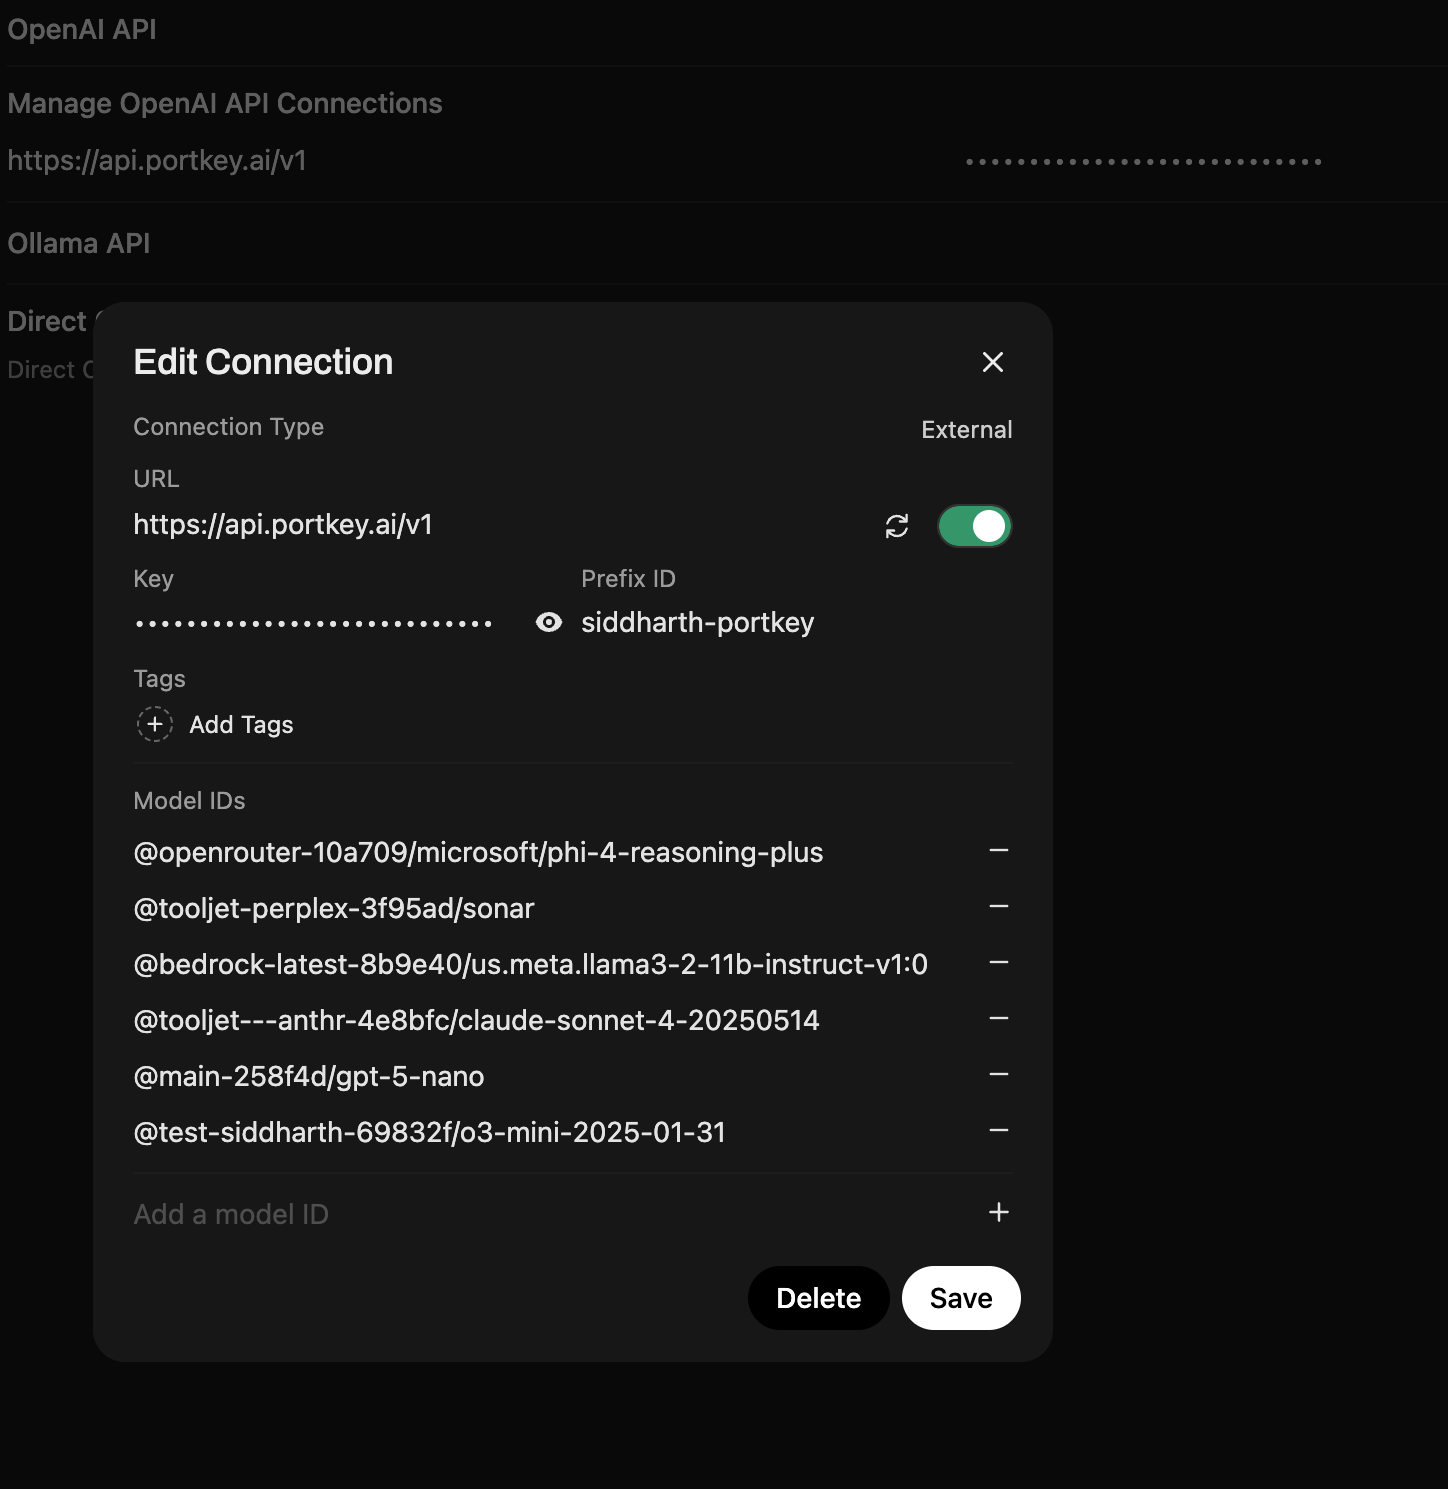 Click **Save** to finish.
1. Return to the main chat interface and pick your Portkey-backed model (format: `@provider/model`).
2. Start chatting.
**Anthropic models** require a *Max Tokens* value. Click the settings icon (top right) and set **Max Tokens** to a valid number (for example, 1024).
Monitor requests, usage, and spend in the [Portkey Dashboard](https://app.portkey.ai/dashboard).
### Option B: Portkey Manifold Pipe (Recommended for Enterprise)
The official Portkey Manifold Pipe unlocks enterprise-grade observability and governance features that aren't available through the basic OpenAI-compatible connection:
In typical OpenWebUI deployments, a single shared API key means you lose visibility into which user made which request. Portkey logs show anonymous traffic instead of per-user attribution. The Portkey Manifold Pipe solves this by automatically forwarding OpenWebUI user context to Portkey, enabling true per-user observability, cost tracking, and governance—even with a shared API key setup.
#### Why Use the Manifold Pipe?
Automatically track which OpenWebUI user made each request—essential for enterprise deployments with shared API keys.
Forward OpenWebUI user context (email, name, role, chat ID) as structured metadata for filtering and analytics.
Automatically populate OpenWebUI's model dropdown from your Portkey Model Catalog—no manual configuration.
Built-in retry logic with exponential backoff for non-streaming requests ensures reliable performance.
* **Download:** [portkey\_manifold\_pipe.py](https://raw.githubusercontent.com/Portkey-AI/docs-core/refs/heads/main/integrations/libraries/openwebui-portkey-pipe.py)
* **Best for:** Enterprise deployments with shared infrastructure where user-level tracking, governance, and automated model management are critical.
```python title="portkey_manifold_pipe.py" theme={"system"}
"""
title: Portkey Manifold Pipe
author: Portkey
version: 0.8.0
license: MIT
documentation: https://portkey.ai/docs/integrations/libraries/openwebui
"""
from pydantic import BaseModel, Field
from typing import Union, Generator, Iterator
import json
import requests
class Pipe:
class Valves(BaseModel):
PORTKEY_API_KEY: str = Field(
default="",
description="Your Portkey API key (required).",
)
PORTKEY_API_BASE_URL: str = Field(
default="https://api.portkey.ai/v1",
description="Base URL for Portkey API.",
)
AUTO_DISCOVER_MODELS: bool = Field(
default=True,
description="Auto-fetch models from Portkey.",
)
PORTKEY_MODELS: str = Field(
default="@openai-slug/gpt-4o, @anthropic-slug/claude-sonnet-latest",
description="Comma-separated model IDs (used when auto-discovery is off or as fallback).",
)
def __init__(self):
self.type = "manifold"
self.valves = self.Valves()
self.name = "PORTKEY"
def pipes(self) -> list:
model_ids = []
# Auto-discover models from Portkey
if self.valves.AUTO_DISCOVER_MODELS and self.valves.PORTKEY_API_KEY:
try:
r = requests.get(
f"{self.valves.PORTKEY_API_BASE_URL}/models",
headers={"Authorization": f"Bearer {self.valves.PORTKEY_API_KEY}"},
timeout=10,
)
if r.status_code == 200:
data = r.json().get("data", [])
model_ids = [
m["id"] for m in data if isinstance(m, dict) and "id" in m
]
except:
pass # Fallback to manual list
# Add manual models
if self.valves.PORTKEY_MODELS:
manual = [
m.strip() for m in self.valves.PORTKEY_MODELS.split(",") if m.strip()
]
model_ids.extend(manual)
# Deduplicate
seen = set()
unique = []
for m in model_ids:
if m not in seen:
seen.add(m)
unique.append(m)
return [{"id": m, "name": m} for m in unique]
def pipe(self, body: dict, __user__: dict) -> Union[str, Generator, Iterator]:
if not self.valves.PORTKEY_API_KEY:
raise Exception("PORTKEY_API_KEY is required.")
# Clean model ID (remove OpenWebUI prefix)
full_model_id = body.get("model", "")
actual_model_id = (
full_model_id.split(".", 1)[-1] if "." in full_model_id else full_model_id
)
payload = {**body, "model": actual_model_id}
# Build headers with metadata
headers = {
"Authorization": f"Bearer {self.valves.PORTKEY_API_KEY}",
"Content-Type": "application/json",
}
metadata = {}
if __user__:
if "email" in __user__:
metadata["_user"] = __user__["email"] # Special key for User column
metadata["email"] = __user__["email"]
if "name" in __user__:
metadata["name"] = __user__["name"]
if "id" in __user__:
metadata["user_id"] = __user__["id"]
if "role" in __user__:
metadata["role"] = __user__["role"]
if "chat_id" in __user__:
metadata["chat_id"] = __user__["chat_id"]
if metadata:
headers["x-portkey-metadata"] = json.dumps(metadata)
try:
r = requests.post(
url=f"{self.valves.PORTKEY_API_BASE_URL}/chat/completions",
json=payload,
headers=headers,
stream=body.get("stream", True),
)
r.raise_for_status()
return r.iter_lines() if body.get("stream", True) else r.json()
except requests.HTTPError as e:
error_msg = f"Portkey API Error: {e.response.status_code}"
try:
error_details = e.response.json()
error_msg += f" - {json.dumps(error_details)}"
except:
pass
raise Exception(error_msg)
except Exception as e:
raise Exception(f"Error: {str(e)}")
```
1. Open your **OpenWebUI Workspace**.
* Click the **user icon** in the bottom-left corner.
* Select **Admin Panel**.
2. In the Admin Panel, go to the **Functions** tab.
3. Click the **+** button to create a new function.
4. Copy the function code provided in the accordion above and paste it into the editor.
5. Set the function name to **Portkey Function** and add a description.
6. Click **Save** to finish.
1. In OpenWebUI, choose the `PORTKEY` pipe from the dropdown.
2. Open the **Valves** panel and configure:
**Required Configuration:**
* **PORTKEY\_API\_KEY**: Your Portkey API key (required)
* **PORTKEY\_API\_BASE\_URL**: Default `https://api.portkey.ai/v1` (change only for self-hosted)
**Model Management:**
* **AUTO\_DISCOVER\_MODELS**: Enable to automatically fetch available models from Portkey's catalog (recommended)
* **PORTKEY\_MODELS**: Comma-separated model slugs for manual curation. Example: `@openai-provider/gpt-4o, @anthropic-provider-slug/claude-sonnet-latest`
**Enterprise Tip:** The pipe automatically forwards OpenWebUI user metadata (name, email, role, chat\_id) to Portkey via the `x-portkey-metadata` header. This solves the shared API key attribution problem—you'll see per-user details in Portkey logs even when all users share the same API key.
1. Start chatting in OpenWebUI with the PORTKEY pipe selected.
2. Open the [Portkey Logs dashboard](https://app.portkey.ai/logs).
3. You should now see detailed user attribution in your logs:
* User email, name, and role visible in request metadata
* Filter logs by specific users or teams
* Track costs and usage per team member
**Success!** You've solved the shared API key problem. Every request now shows which OpenWebUI user originated it, enabling true enterprise observability.
1. Reference [Configs](https://docs.portkey.ai/configs) at the API key level to enable routing, fallbacks, caching, or segmentation.
2. Set up [budget limits and rate controls](/product/model-catalog/integrations#3-budget-%26-rate-limits) through Portkey's Model Catalog.
3. All governance policies automatically apply across OpenWebUI users via the shared setup.
#### What You'll See in Portkey
Once configured, the manifold pipe automatically captures and displays OpenWebUI user context in every request. **User emails appear directly in the User column** of your logs list view—no need to click into individual entries.
Click **Save** to finish.
1. Return to the main chat interface and pick your Portkey-backed model (format: `@provider/model`).
2. Start chatting.
**Anthropic models** require a *Max Tokens* value. Click the settings icon (top right) and set **Max Tokens** to a valid number (for example, 1024).
Monitor requests, usage, and spend in the [Portkey Dashboard](https://app.portkey.ai/dashboard).
### Option B: Portkey Manifold Pipe (Recommended for Enterprise)
The official Portkey Manifold Pipe unlocks enterprise-grade observability and governance features that aren't available through the basic OpenAI-compatible connection:
In typical OpenWebUI deployments, a single shared API key means you lose visibility into which user made which request. Portkey logs show anonymous traffic instead of per-user attribution. The Portkey Manifold Pipe solves this by automatically forwarding OpenWebUI user context to Portkey, enabling true per-user observability, cost tracking, and governance—even with a shared API key setup.
#### Why Use the Manifold Pipe?
Automatically track which OpenWebUI user made each request—essential for enterprise deployments with shared API keys.
Forward OpenWebUI user context (email, name, role, chat ID) as structured metadata for filtering and analytics.
Automatically populate OpenWebUI's model dropdown from your Portkey Model Catalog—no manual configuration.
Built-in retry logic with exponential backoff for non-streaming requests ensures reliable performance.
* **Download:** [portkey\_manifold\_pipe.py](https://raw.githubusercontent.com/Portkey-AI/docs-core/refs/heads/main/integrations/libraries/openwebui-portkey-pipe.py)
* **Best for:** Enterprise deployments with shared infrastructure where user-level tracking, governance, and automated model management are critical.
```python title="portkey_manifold_pipe.py" theme={"system"}
"""
title: Portkey Manifold Pipe
author: Portkey
version: 0.8.0
license: MIT
documentation: https://portkey.ai/docs/integrations/libraries/openwebui
"""
from pydantic import BaseModel, Field
from typing import Union, Generator, Iterator
import json
import requests
class Pipe:
class Valves(BaseModel):
PORTKEY_API_KEY: str = Field(
default="",
description="Your Portkey API key (required).",
)
PORTKEY_API_BASE_URL: str = Field(
default="https://api.portkey.ai/v1",
description="Base URL for Portkey API.",
)
AUTO_DISCOVER_MODELS: bool = Field(
default=True,
description="Auto-fetch models from Portkey.",
)
PORTKEY_MODELS: str = Field(
default="@openai-slug/gpt-4o, @anthropic-slug/claude-sonnet-latest",
description="Comma-separated model IDs (used when auto-discovery is off or as fallback).",
)
def __init__(self):
self.type = "manifold"
self.valves = self.Valves()
self.name = "PORTKEY"
def pipes(self) -> list:
model_ids = []
# Auto-discover models from Portkey
if self.valves.AUTO_DISCOVER_MODELS and self.valves.PORTKEY_API_KEY:
try:
r = requests.get(
f"{self.valves.PORTKEY_API_BASE_URL}/models",
headers={"Authorization": f"Bearer {self.valves.PORTKEY_API_KEY}"},
timeout=10,
)
if r.status_code == 200:
data = r.json().get("data", [])
model_ids = [
m["id"] for m in data if isinstance(m, dict) and "id" in m
]
except:
pass # Fallback to manual list
# Add manual models
if self.valves.PORTKEY_MODELS:
manual = [
m.strip() for m in self.valves.PORTKEY_MODELS.split(",") if m.strip()
]
model_ids.extend(manual)
# Deduplicate
seen = set()
unique = []
for m in model_ids:
if m not in seen:
seen.add(m)
unique.append(m)
return [{"id": m, "name": m} for m in unique]
def pipe(self, body: dict, __user__: dict) -> Union[str, Generator, Iterator]:
if not self.valves.PORTKEY_API_KEY:
raise Exception("PORTKEY_API_KEY is required.")
# Clean model ID (remove OpenWebUI prefix)
full_model_id = body.get("model", "")
actual_model_id = (
full_model_id.split(".", 1)[-1] if "." in full_model_id else full_model_id
)
payload = {**body, "model": actual_model_id}
# Build headers with metadata
headers = {
"Authorization": f"Bearer {self.valves.PORTKEY_API_KEY}",
"Content-Type": "application/json",
}
metadata = {}
if __user__:
if "email" in __user__:
metadata["_user"] = __user__["email"] # Special key for User column
metadata["email"] = __user__["email"]
if "name" in __user__:
metadata["name"] = __user__["name"]
if "id" in __user__:
metadata["user_id"] = __user__["id"]
if "role" in __user__:
metadata["role"] = __user__["role"]
if "chat_id" in __user__:
metadata["chat_id"] = __user__["chat_id"]
if metadata:
headers["x-portkey-metadata"] = json.dumps(metadata)
try:
r = requests.post(
url=f"{self.valves.PORTKEY_API_BASE_URL}/chat/completions",
json=payload,
headers=headers,
stream=body.get("stream", True),
)
r.raise_for_status()
return r.iter_lines() if body.get("stream", True) else r.json()
except requests.HTTPError as e:
error_msg = f"Portkey API Error: {e.response.status_code}"
try:
error_details = e.response.json()
error_msg += f" - {json.dumps(error_details)}"
except:
pass
raise Exception(error_msg)
except Exception as e:
raise Exception(f"Error: {str(e)}")
```
1. Open your **OpenWebUI Workspace**.
* Click the **user icon** in the bottom-left corner.
* Select **Admin Panel**.
2. In the Admin Panel, go to the **Functions** tab.
3. Click the **+** button to create a new function.
4. Copy the function code provided in the accordion above and paste it into the editor.
5. Set the function name to **Portkey Function** and add a description.
6. Click **Save** to finish.
1. In OpenWebUI, choose the `PORTKEY` pipe from the dropdown.
2. Open the **Valves** panel and configure:
**Required Configuration:**
* **PORTKEY\_API\_KEY**: Your Portkey API key (required)
* **PORTKEY\_API\_BASE\_URL**: Default `https://api.portkey.ai/v1` (change only for self-hosted)
**Model Management:**
* **AUTO\_DISCOVER\_MODELS**: Enable to automatically fetch available models from Portkey's catalog (recommended)
* **PORTKEY\_MODELS**: Comma-separated model slugs for manual curation. Example: `@openai-provider/gpt-4o, @anthropic-provider-slug/claude-sonnet-latest`
**Enterprise Tip:** The pipe automatically forwards OpenWebUI user metadata (name, email, role, chat\_id) to Portkey via the `x-portkey-metadata` header. This solves the shared API key attribution problem—you'll see per-user details in Portkey logs even when all users share the same API key.
1. Start chatting in OpenWebUI with the PORTKEY pipe selected.
2. Open the [Portkey Logs dashboard](https://app.portkey.ai/logs).
3. You should now see detailed user attribution in your logs:
* User email, name, and role visible in request metadata
* Filter logs by specific users or teams
* Track costs and usage per team member
**Success!** You've solved the shared API key problem. Every request now shows which OpenWebUI user originated it, enabling true enterprise observability.
1. Reference [Configs](https://docs.portkey.ai/configs) at the API key level to enable routing, fallbacks, caching, or segmentation.
2. Set up [budget limits and rate controls](/product/model-catalog/integrations#3-budget-%26-rate-limits) through Portkey's Model Catalog.
3. All governance policies automatically apply across OpenWebUI users via the shared setup.
#### What You'll See in Portkey
Once configured, the manifold pipe automatically captures and displays OpenWebUI user context in every request. **User emails appear directly in the User column** of your logs list view—no need to click into individual entries.
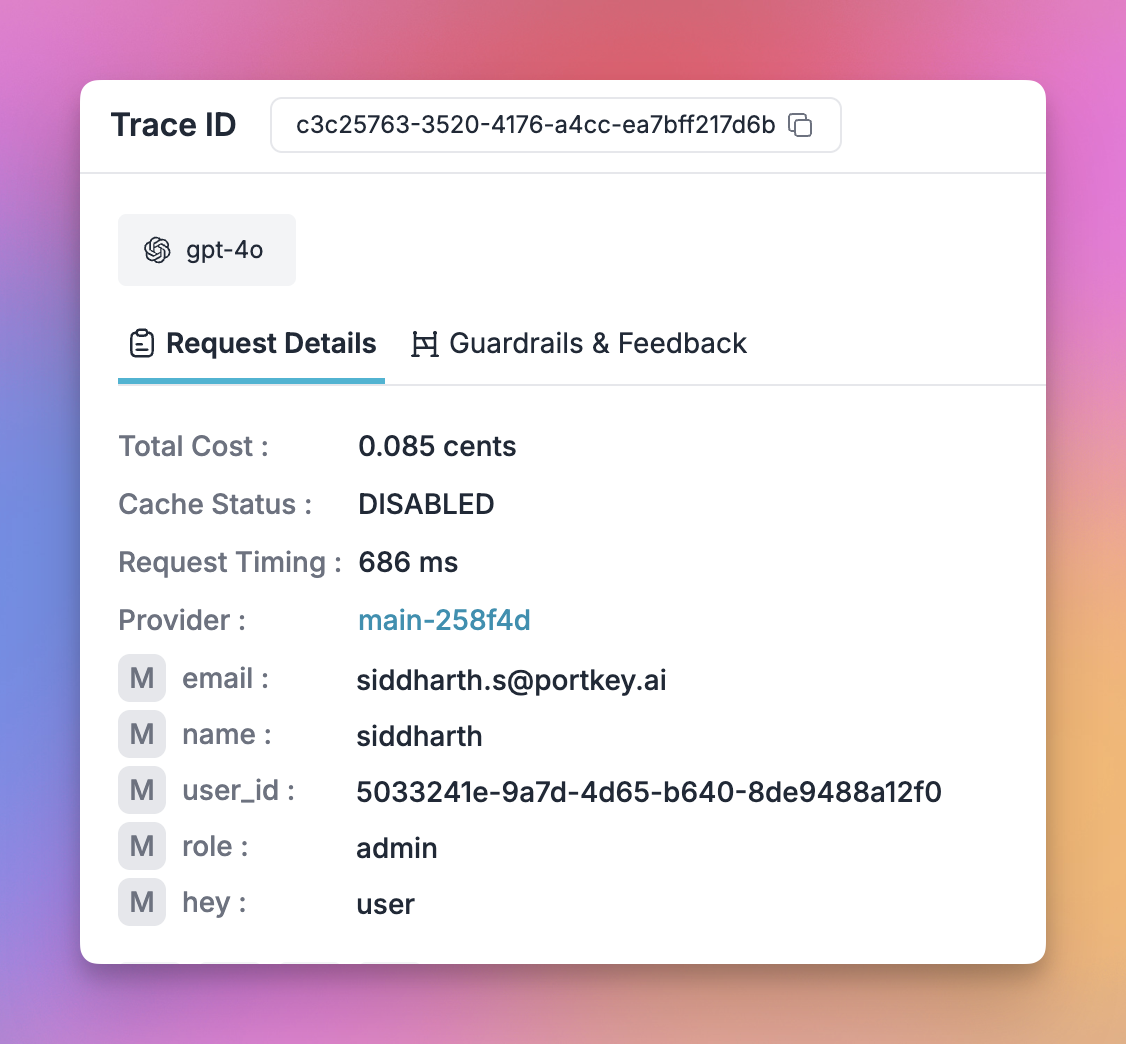 **Captured metadata includes:**
* **User email** – Appears in the User column and metadata (via the special `_user` field)
* **User name** – Full name from OpenWebUI user profile
* **User role** – Admin, user, or custom roles for access control
* **Chat ID** – Track conversations and session context
* **User ID** – Unique identifier for programmatic filtering
This rich metadata enables you to filter logs by specific users, attribute costs to departments, and maintain complete audit trails—all without requiring individual API keys per user.
***
### How the Manifold Pipe Solves Enterprise Attribution
The manifold pipe bridges OpenWebUI's user context with Portkey's observability, solving a critical enterprise pain point:
```
OpenWebUI (User A, User B, User C...)
↓
Shared Portkey API Key
↓
Portkey Logs: All requests appear anonymous
```
**Problem:** No way to attribute costs, track usage, or audit which user accessed which models.
```
OpenWebUI User A → Pipe adds metadata → Portkey
Headers: {"x-portkey-metadata": {"email": "user-a@company.com", "name": "User A", "role": "admin"}}
OpenWebUI User B → Pipe adds metadata → Portkey
Headers: {"x-portkey-metadata": {"email": "user-b@company.com", "name": "User B", "role": "user"}}
```
**Solution:** Full per-user attribution in Portkey logs and analytics, even with a single shared API key.
**This enables:**
* **Cost attribution** per user or department
* **Usage analytics** segmented by team member
* **Compliance & audit trails** showing who accessed sensitive models
* **Governance policies** based on user roles and permissions
The pipe leverages OpenWebUI's `__user__` context object, which contains user details passed from the frontend. This data is automatically formatted as [Portkey metadata](/product/observability/metadata) and attached to every request.
## 3. Set Up Enterprise Governance for OpenWebUI
**Why Enterprise Governance?**
If you are using OpenWebUI inside your organization, consider the following governance pillars:
* **Cost Management**: Controlling and tracking AI spending across teams
* **Access Control**: Managing which teams can access specific models
* **Usage Analytics**: Understanding how AI is being used across the organization
* **Security & Compliance**: Maintaining enterprise security standards
* **Reliability**: Ensuring consistent service across all users
* **Model Management**: Governing how models are provisioned and updated
Portkey adds a comprehensive governance layer to address these enterprise needs. Combine access policies, Configs, and API Keys to orchestrate usage across teams.
**Enterprise Implementation Guide**
### Step 1: Implement Budget Controls & Rate Limits
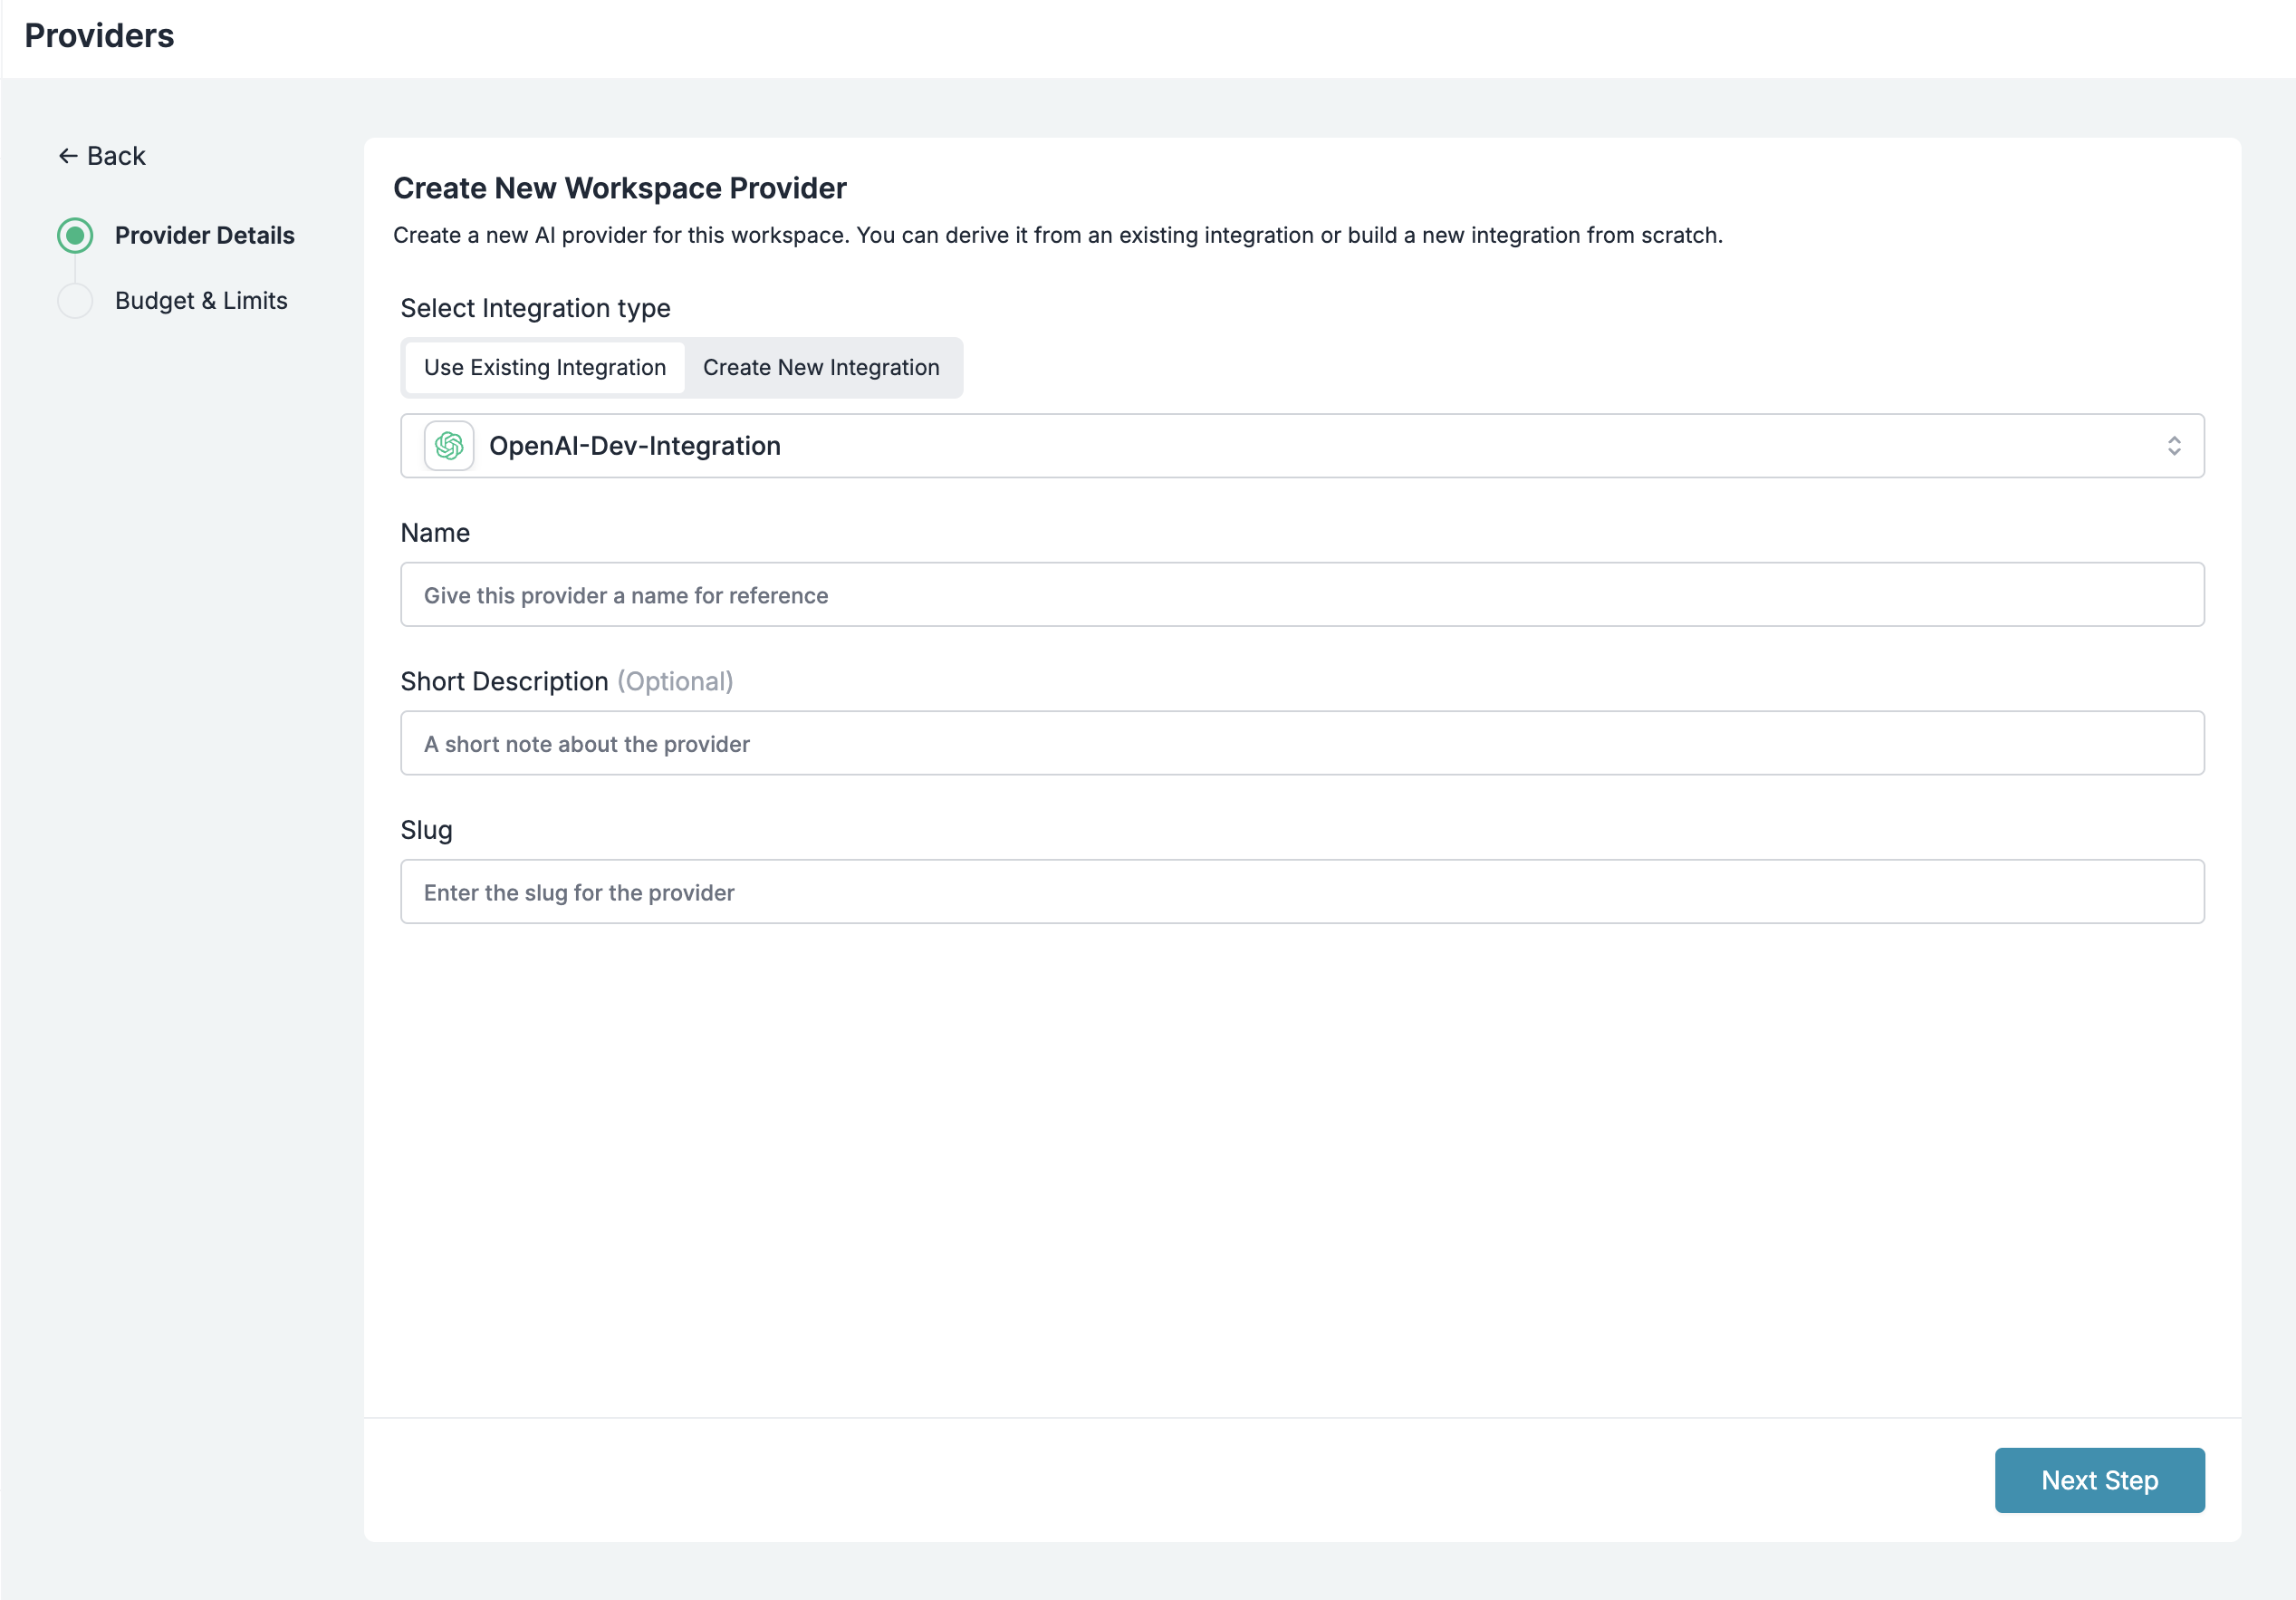
Model Catalog enables you to have granular control over LLM access at the team/department level. This helps you:
* Set up [budget & rate limits](/product/model-catalog/integrations#3-budget-%26-rate-limits)
* Prevent unexpected usage spikes using Rate limits
* Track departmental spending
#### Setting Up Department-Specific Controls:
1. Navigate to [Model Catalog](https://app.portkey.ai/model-catalog) in Portkey dashboard
2. Create new Provider for each engineering team with budget limits and rate limits
3. Configure department-specific limits
**Captured metadata includes:**
* **User email** – Appears in the User column and metadata (via the special `_user` field)
* **User name** – Full name from OpenWebUI user profile
* **User role** – Admin, user, or custom roles for access control
* **Chat ID** – Track conversations and session context
* **User ID** – Unique identifier for programmatic filtering
This rich metadata enables you to filter logs by specific users, attribute costs to departments, and maintain complete audit trails—all without requiring individual API keys per user.
***
### How the Manifold Pipe Solves Enterprise Attribution
The manifold pipe bridges OpenWebUI's user context with Portkey's observability, solving a critical enterprise pain point:
```
OpenWebUI (User A, User B, User C...)
↓
Shared Portkey API Key
↓
Portkey Logs: All requests appear anonymous
```
**Problem:** No way to attribute costs, track usage, or audit which user accessed which models.
```
OpenWebUI User A → Pipe adds metadata → Portkey
Headers: {"x-portkey-metadata": {"email": "user-a@company.com", "name": "User A", "role": "admin"}}
OpenWebUI User B → Pipe adds metadata → Portkey
Headers: {"x-portkey-metadata": {"email": "user-b@company.com", "name": "User B", "role": "user"}}
```
**Solution:** Full per-user attribution in Portkey logs and analytics, even with a single shared API key.
**This enables:**
* **Cost attribution** per user or department
* **Usage analytics** segmented by team member
* **Compliance & audit trails** showing who accessed sensitive models
* **Governance policies** based on user roles and permissions
The pipe leverages OpenWebUI's `__user__` context object, which contains user details passed from the frontend. This data is automatically formatted as [Portkey metadata](/product/observability/metadata) and attached to every request.
## 3. Set Up Enterprise Governance for OpenWebUI
**Why Enterprise Governance?**
If you are using OpenWebUI inside your organization, consider the following governance pillars:
* **Cost Management**: Controlling and tracking AI spending across teams
* **Access Control**: Managing which teams can access specific models
* **Usage Analytics**: Understanding how AI is being used across the organization
* **Security & Compliance**: Maintaining enterprise security standards
* **Reliability**: Ensuring consistent service across all users
* **Model Management**: Governing how models are provisioned and updated
Portkey adds a comprehensive governance layer to address these enterprise needs. Combine access policies, Configs, and API Keys to orchestrate usage across teams.
**Enterprise Implementation Guide**
### Step 1: Implement Budget Controls & Rate Limits
Model Catalog enables you to have granular control over LLM access at the team/department level. This helps you:
* Set up [budget & rate limits](/product/model-catalog/integrations#3-budget-%26-rate-limits)
* Prevent unexpected usage spikes using Rate limits
* Track departmental spending
#### Setting Up Department-Specific Controls:
1. Navigate to [Model Catalog](https://app.portkey.ai/model-catalog) in Portkey dashboard
2. Create new Provider for each engineering team with budget limits and rate limits
3. Configure department-specific limits
 ### Step 2: Define Model Access Rules
Use the Model Catalog to provision which models are exposed to each integration or workspace.
### Step 2: Define Model Access Rules
Use the Model Catalog to provision which models are exposed to each integration or workspace.
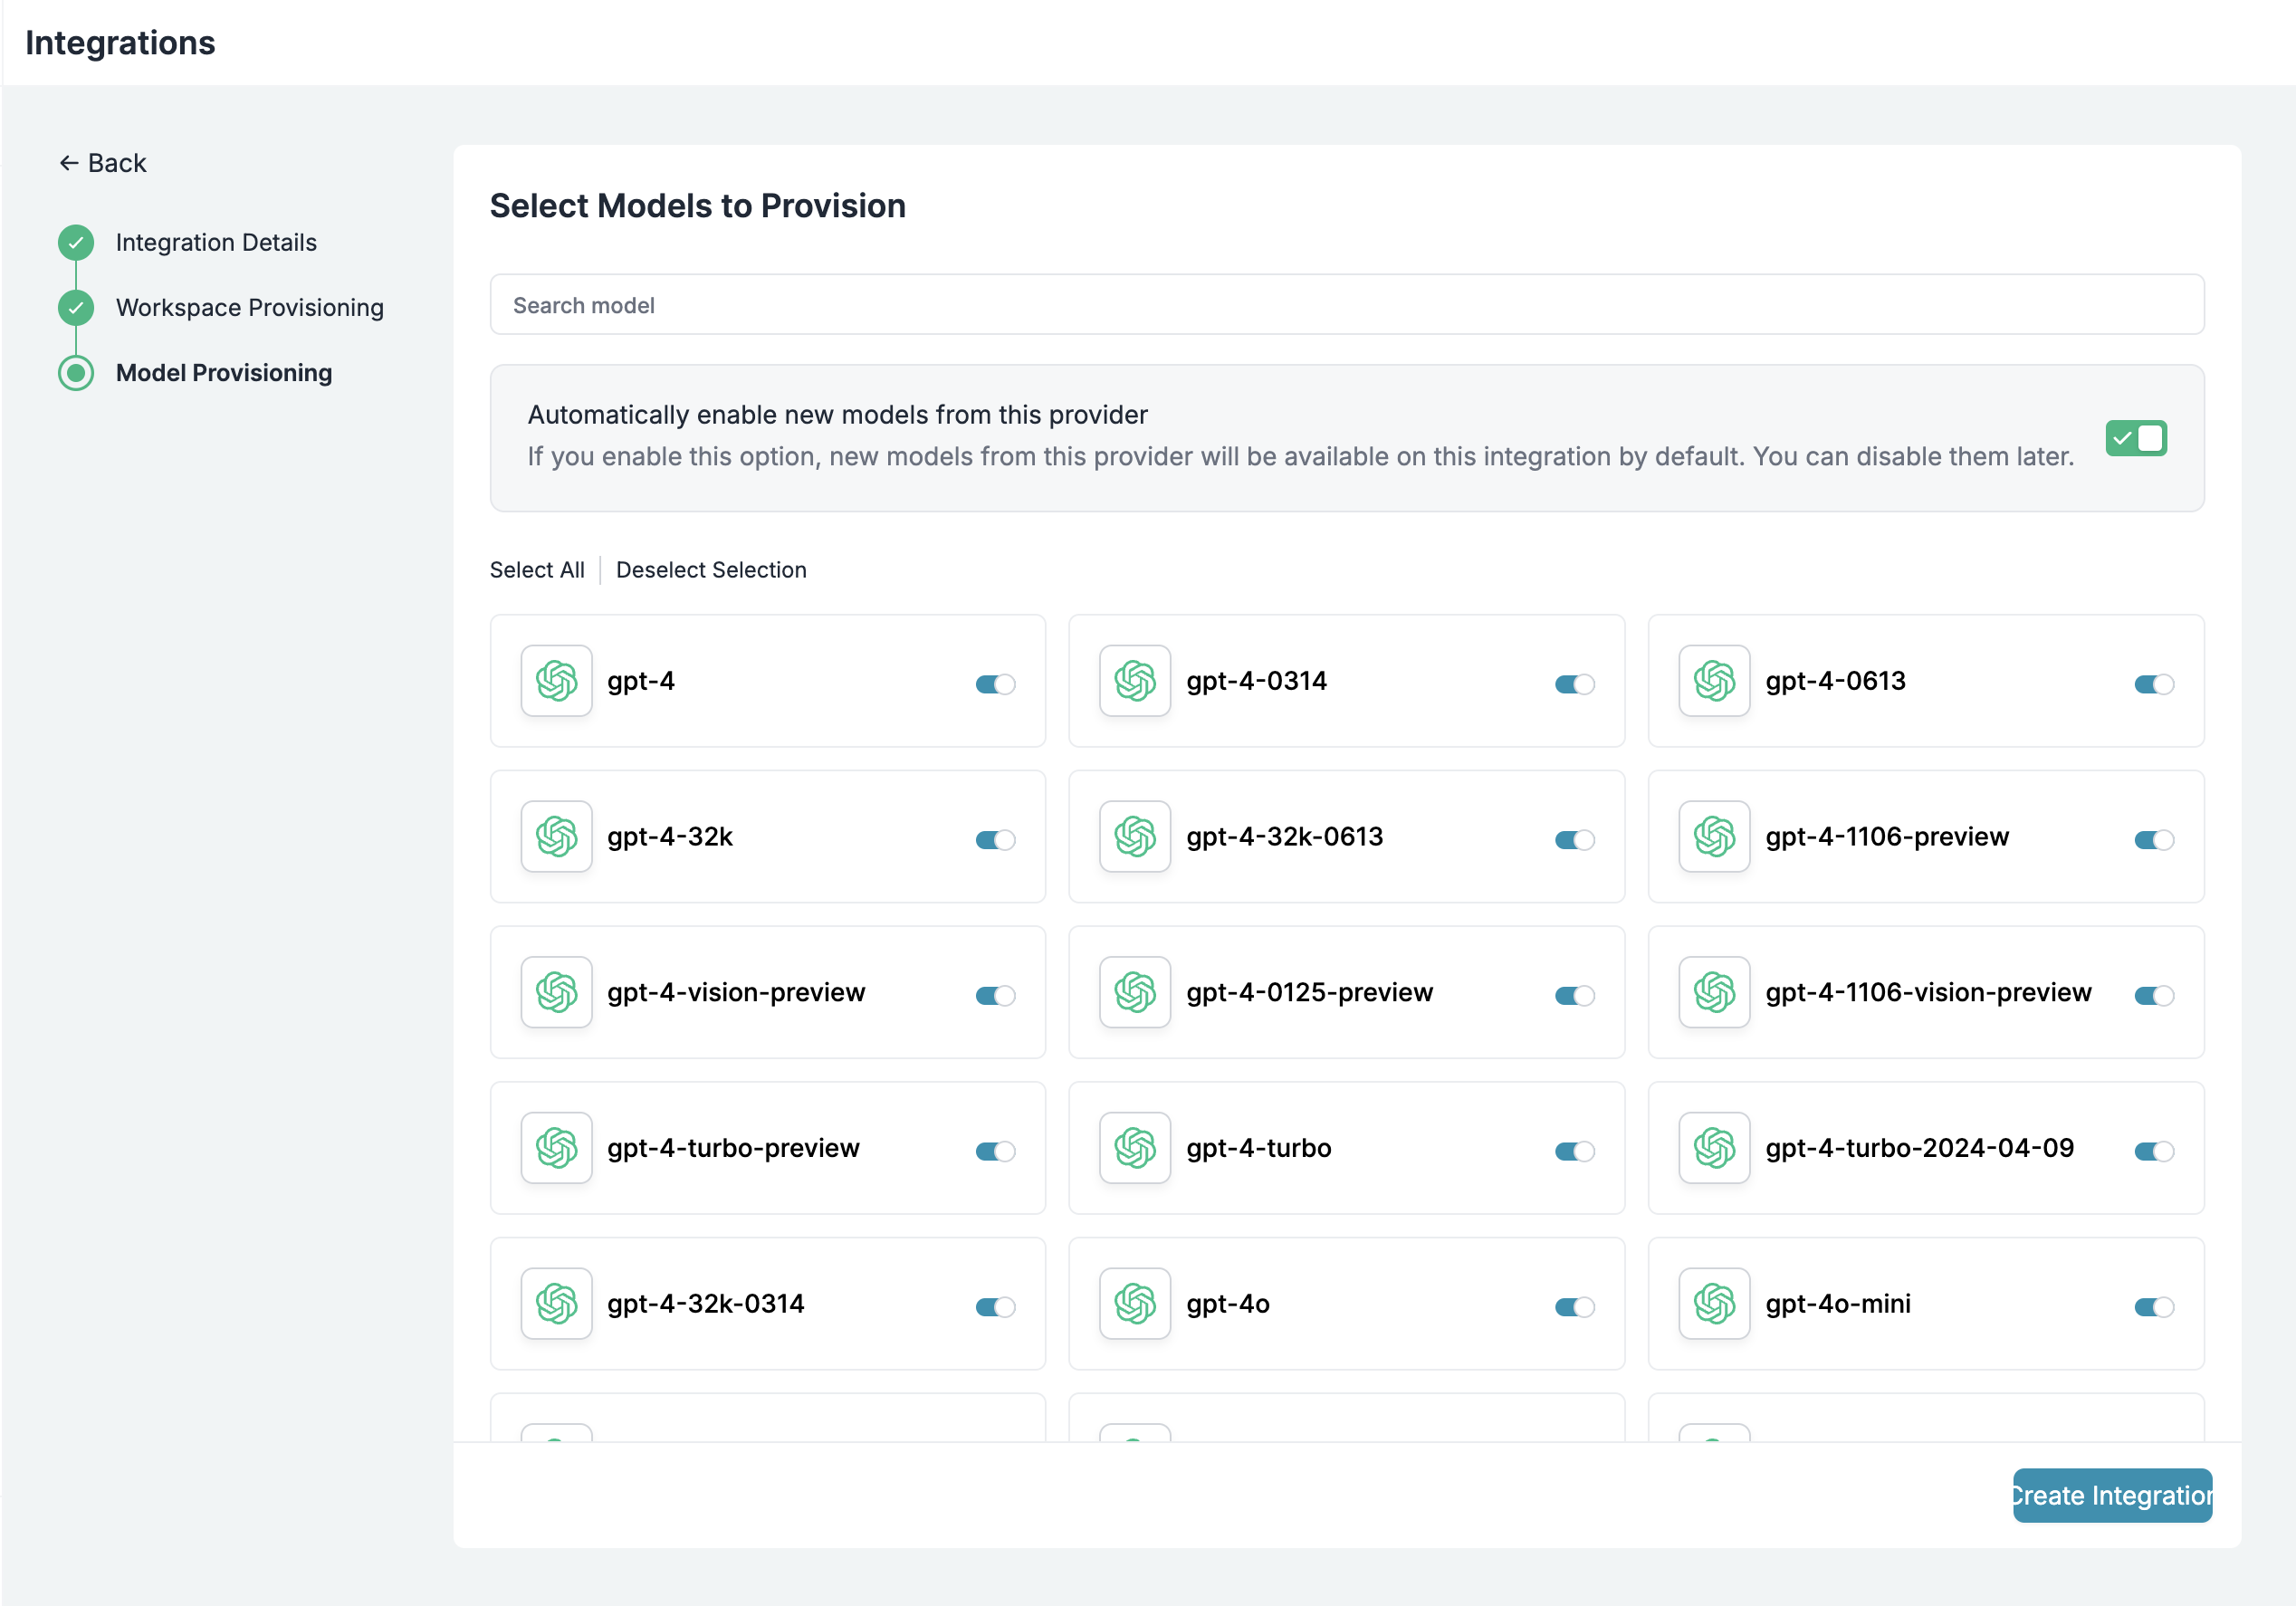 Leverage Portkey Configs to enforce provider- or model-specific guardrails without editing your OpenWebUI setup.
Portkey Configs control routing logic, fallbacks, caching, and data protection.
```json theme={"system"}
{
"strategy": {
"mode": "load-balance"
},
"targets": [
{
"override_params": {
"model": "@YOUR_OPENAI_PROVIDER_SLUG/gpt-model"
}
},
{
"override_params": {
"model": "@YOUR_ANTHROPIC_PROVIDER/claude-sonnet-model"
}
}
]
}
```
Create or edit configs in the [Configs Library](https://app.portkey.ai/configs). Reference the config ID inside OpenWebUI requests or pipe valves.
Configs can be updated anytime to adjust policies without redeploying OpenWebUI.
Create user- or team-specific API keys that automatically:
* Track usage with metadata
* Apply the right configs and access policies
* Enforce scoped permissions
Create API keys through the [Portkey App](https://app.portkey.ai/) or the [API Key Management API](/api-reference/admin-api/control-plane/api-keys/create-api-key):
```python theme={"system"}
from portkey_ai import Portkey
portkey = Portkey(api_key="YOUR_ADMIN_API_KEY")
api_key = portkey.api_keys.create(
name="frontend-engineering",
type="organisation",
workspace_id="YOUR_WORKSPACE_ID",
defaults={
"config_id": "your-config-id",
"metadata": {
"environment": "development",
"department": "engineering",
"team": "frontend"
}
},
scopes=["logs.view", "configs.read"]
)
```
Distribute API keys, apply your governance defaults, and monitor live usage inside the Portkey dashboard:
* Cost tracking by department
* Model usage patterns
* Request volumes and error rates
* Audit-ready metadata
### Enterprise Features Now Available
**OpenWebUI now has:**
* Per-developer budget controls
* Model access governance
* Usage tracking & attribution
* Code security guardrails
* Reliability features for development workflows
Here's the new section for image generation using Portkey with Open WebUI:
## 4. Image Generation with Portkey
Portkey enables seamless image generation through Open WebUI by providing a unified interface for various image generation models like DALL-E 2, DALL-E 3, and other compatible models. This integration allows you to leverage Portkey's enterprise features including cost tracking, access controls, and observability for all your image generation needs.
### Setting Up Image Generation
Before proceeding, ensure you have completed the workspace setup in [Step 1](#1-prepare-your-portkey-workspace) and have your Portkey API key ready. Image generation works with either integration path above.
1. Navigate to your Open WebUI **Admin Panel**
2. Go to **Settings** → **Images** from the sidebar
Leverage Portkey Configs to enforce provider- or model-specific guardrails without editing your OpenWebUI setup.
Portkey Configs control routing logic, fallbacks, caching, and data protection.
```json theme={"system"}
{
"strategy": {
"mode": "load-balance"
},
"targets": [
{
"override_params": {
"model": "@YOUR_OPENAI_PROVIDER_SLUG/gpt-model"
}
},
{
"override_params": {
"model": "@YOUR_ANTHROPIC_PROVIDER/claude-sonnet-model"
}
}
]
}
```
Create or edit configs in the [Configs Library](https://app.portkey.ai/configs). Reference the config ID inside OpenWebUI requests or pipe valves.
Configs can be updated anytime to adjust policies without redeploying OpenWebUI.
Create user- or team-specific API keys that automatically:
* Track usage with metadata
* Apply the right configs and access policies
* Enforce scoped permissions
Create API keys through the [Portkey App](https://app.portkey.ai/) or the [API Key Management API](/api-reference/admin-api/control-plane/api-keys/create-api-key):
```python theme={"system"}
from portkey_ai import Portkey
portkey = Portkey(api_key="YOUR_ADMIN_API_KEY")
api_key = portkey.api_keys.create(
name="frontend-engineering",
type="organisation",
workspace_id="YOUR_WORKSPACE_ID",
defaults={
"config_id": "your-config-id",
"metadata": {
"environment": "development",
"department": "engineering",
"team": "frontend"
}
},
scopes=["logs.view", "configs.read"]
)
```
Distribute API keys, apply your governance defaults, and monitor live usage inside the Portkey dashboard:
* Cost tracking by department
* Model usage patterns
* Request volumes and error rates
* Audit-ready metadata
### Enterprise Features Now Available
**OpenWebUI now has:**
* Per-developer budget controls
* Model access governance
* Usage tracking & attribution
* Code security guardrails
* Reliability features for development workflows
Here's the new section for image generation using Portkey with Open WebUI:
## 4. Image Generation with Portkey
Portkey enables seamless image generation through Open WebUI by providing a unified interface for various image generation models like DALL-E 2, DALL-E 3, and other compatible models. This integration allows you to leverage Portkey's enterprise features including cost tracking, access controls, and observability for all your image generation needs.
### Setting Up Image Generation
Before proceeding, ensure you have completed the workspace setup in [Step 1](#1-prepare-your-portkey-workspace) and have your Portkey API key ready. Image generation works with either integration path above.
1. Navigate to your Open WebUI **Admin Panel**
2. Go to **Settings** → **Images** from the sidebar
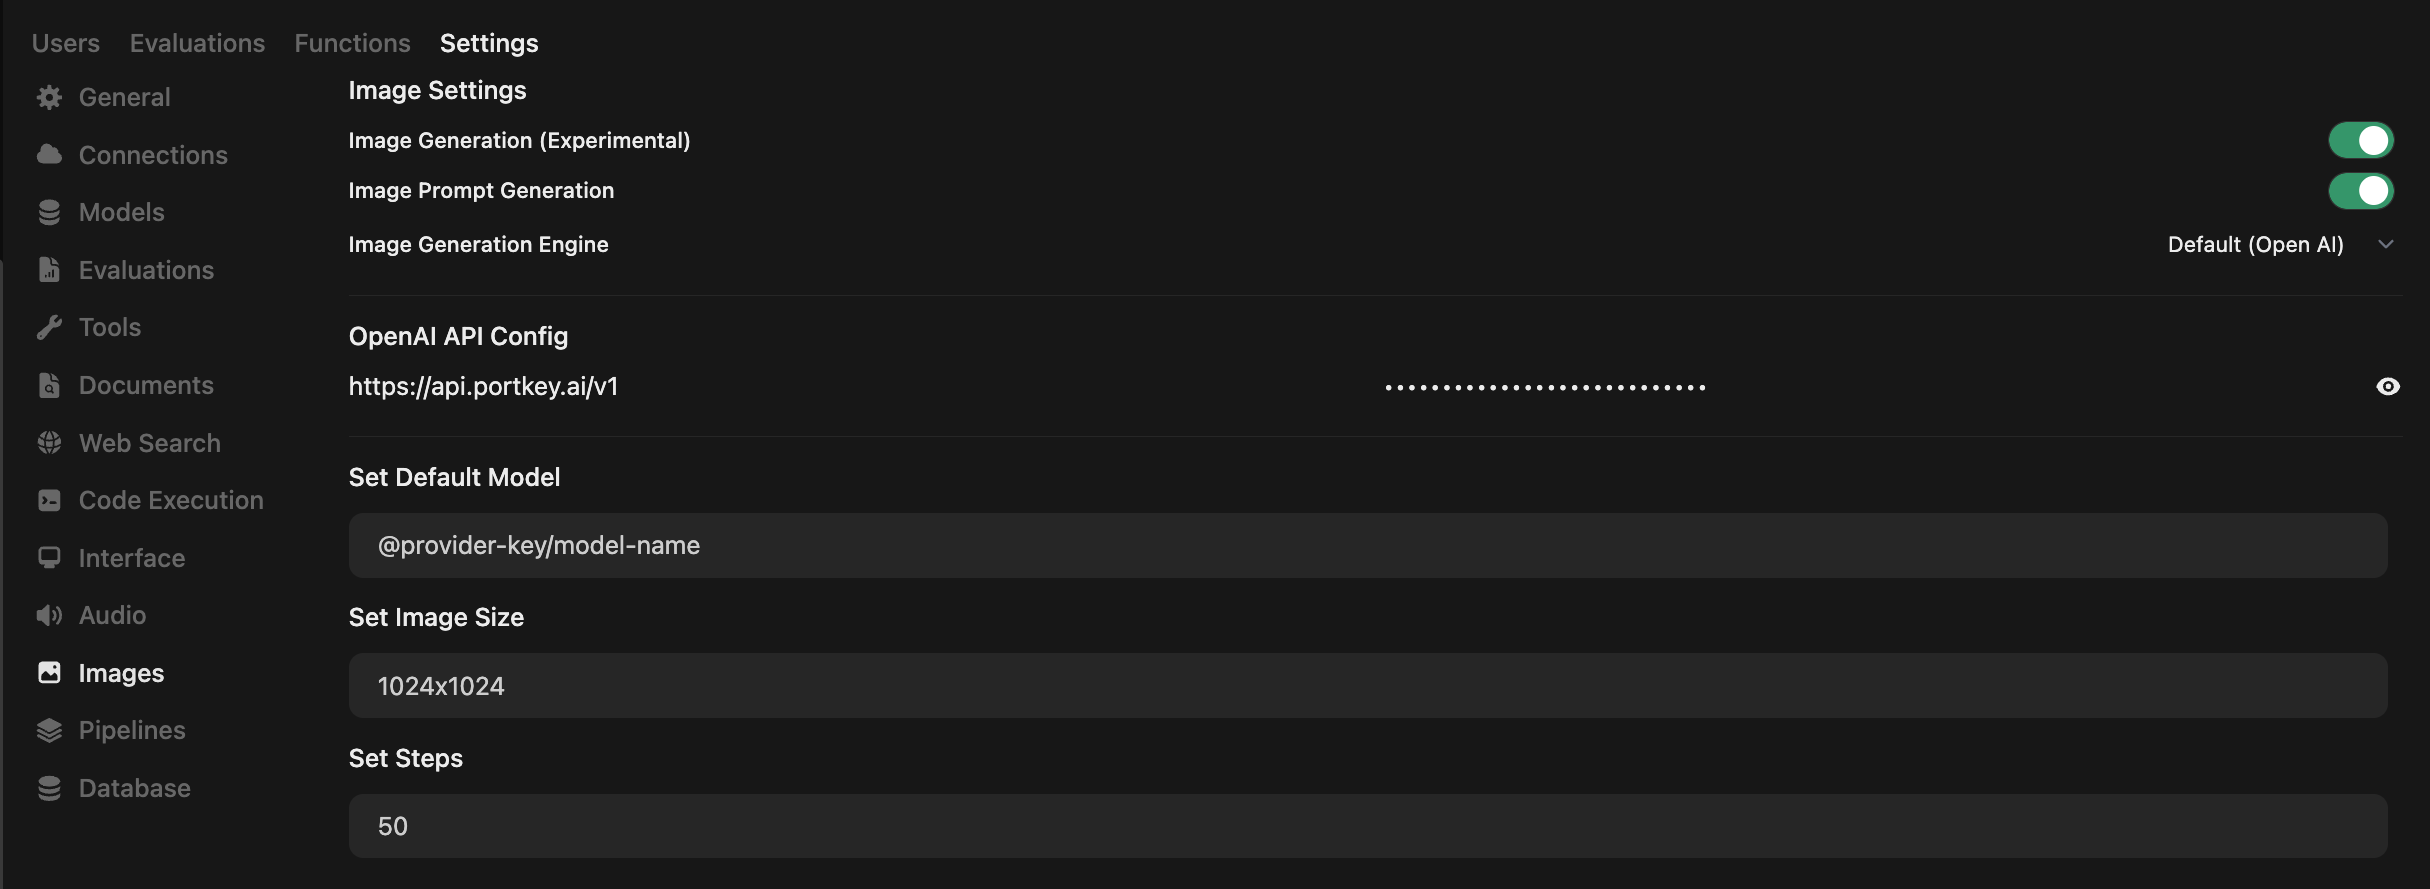 In the Image Settings page, configure the following:
1. **Enable Image Generation**: Toggle ON the **Image Generation (Experimental)** option
2. **Image Generation Engine**: Select **Default (Open AI)** from the dropdown
3. **OpenAI API Config**: Enter Portkey's base URL:
```
https://api.portkey.ai/v1
```
4. **API Key**: Enter your Portkey API key (from [Step 1](#1-setting-up-portkey))
5. **Set Default Model**: Enter your model slug in the format:
```
@provider-key/model-name
```
For example: `@openai-test/dall-e-3`
Choose the model you wish to use. Note that image size options will depend on the selected model:
* DALL·E 2: Supports 256x256, 512x512, or 1024x1024 images.
* DALL·E 3: Supports 1024x1024, 1792x1024, or 1024x1792 images.
* GPT-Image-1: Supports auto, 1024x1024, 1536x1024, or 1024x1536 images.
**Steps**: Set the number of generation steps (typically 50 for good quality)
* **Other Models**: Check your provider's documentation (Gemini, Vertex, and others) for supported sizes.
1. Return to the main chat interface
2. Type a prompt and click the image generation icon
3. Your image will be generated using Portkey's infrastructure
4. Track usage and costs in the [Portkey Dashboard](https://app.portkey.ai/logs)
### Monitoring Image Generation
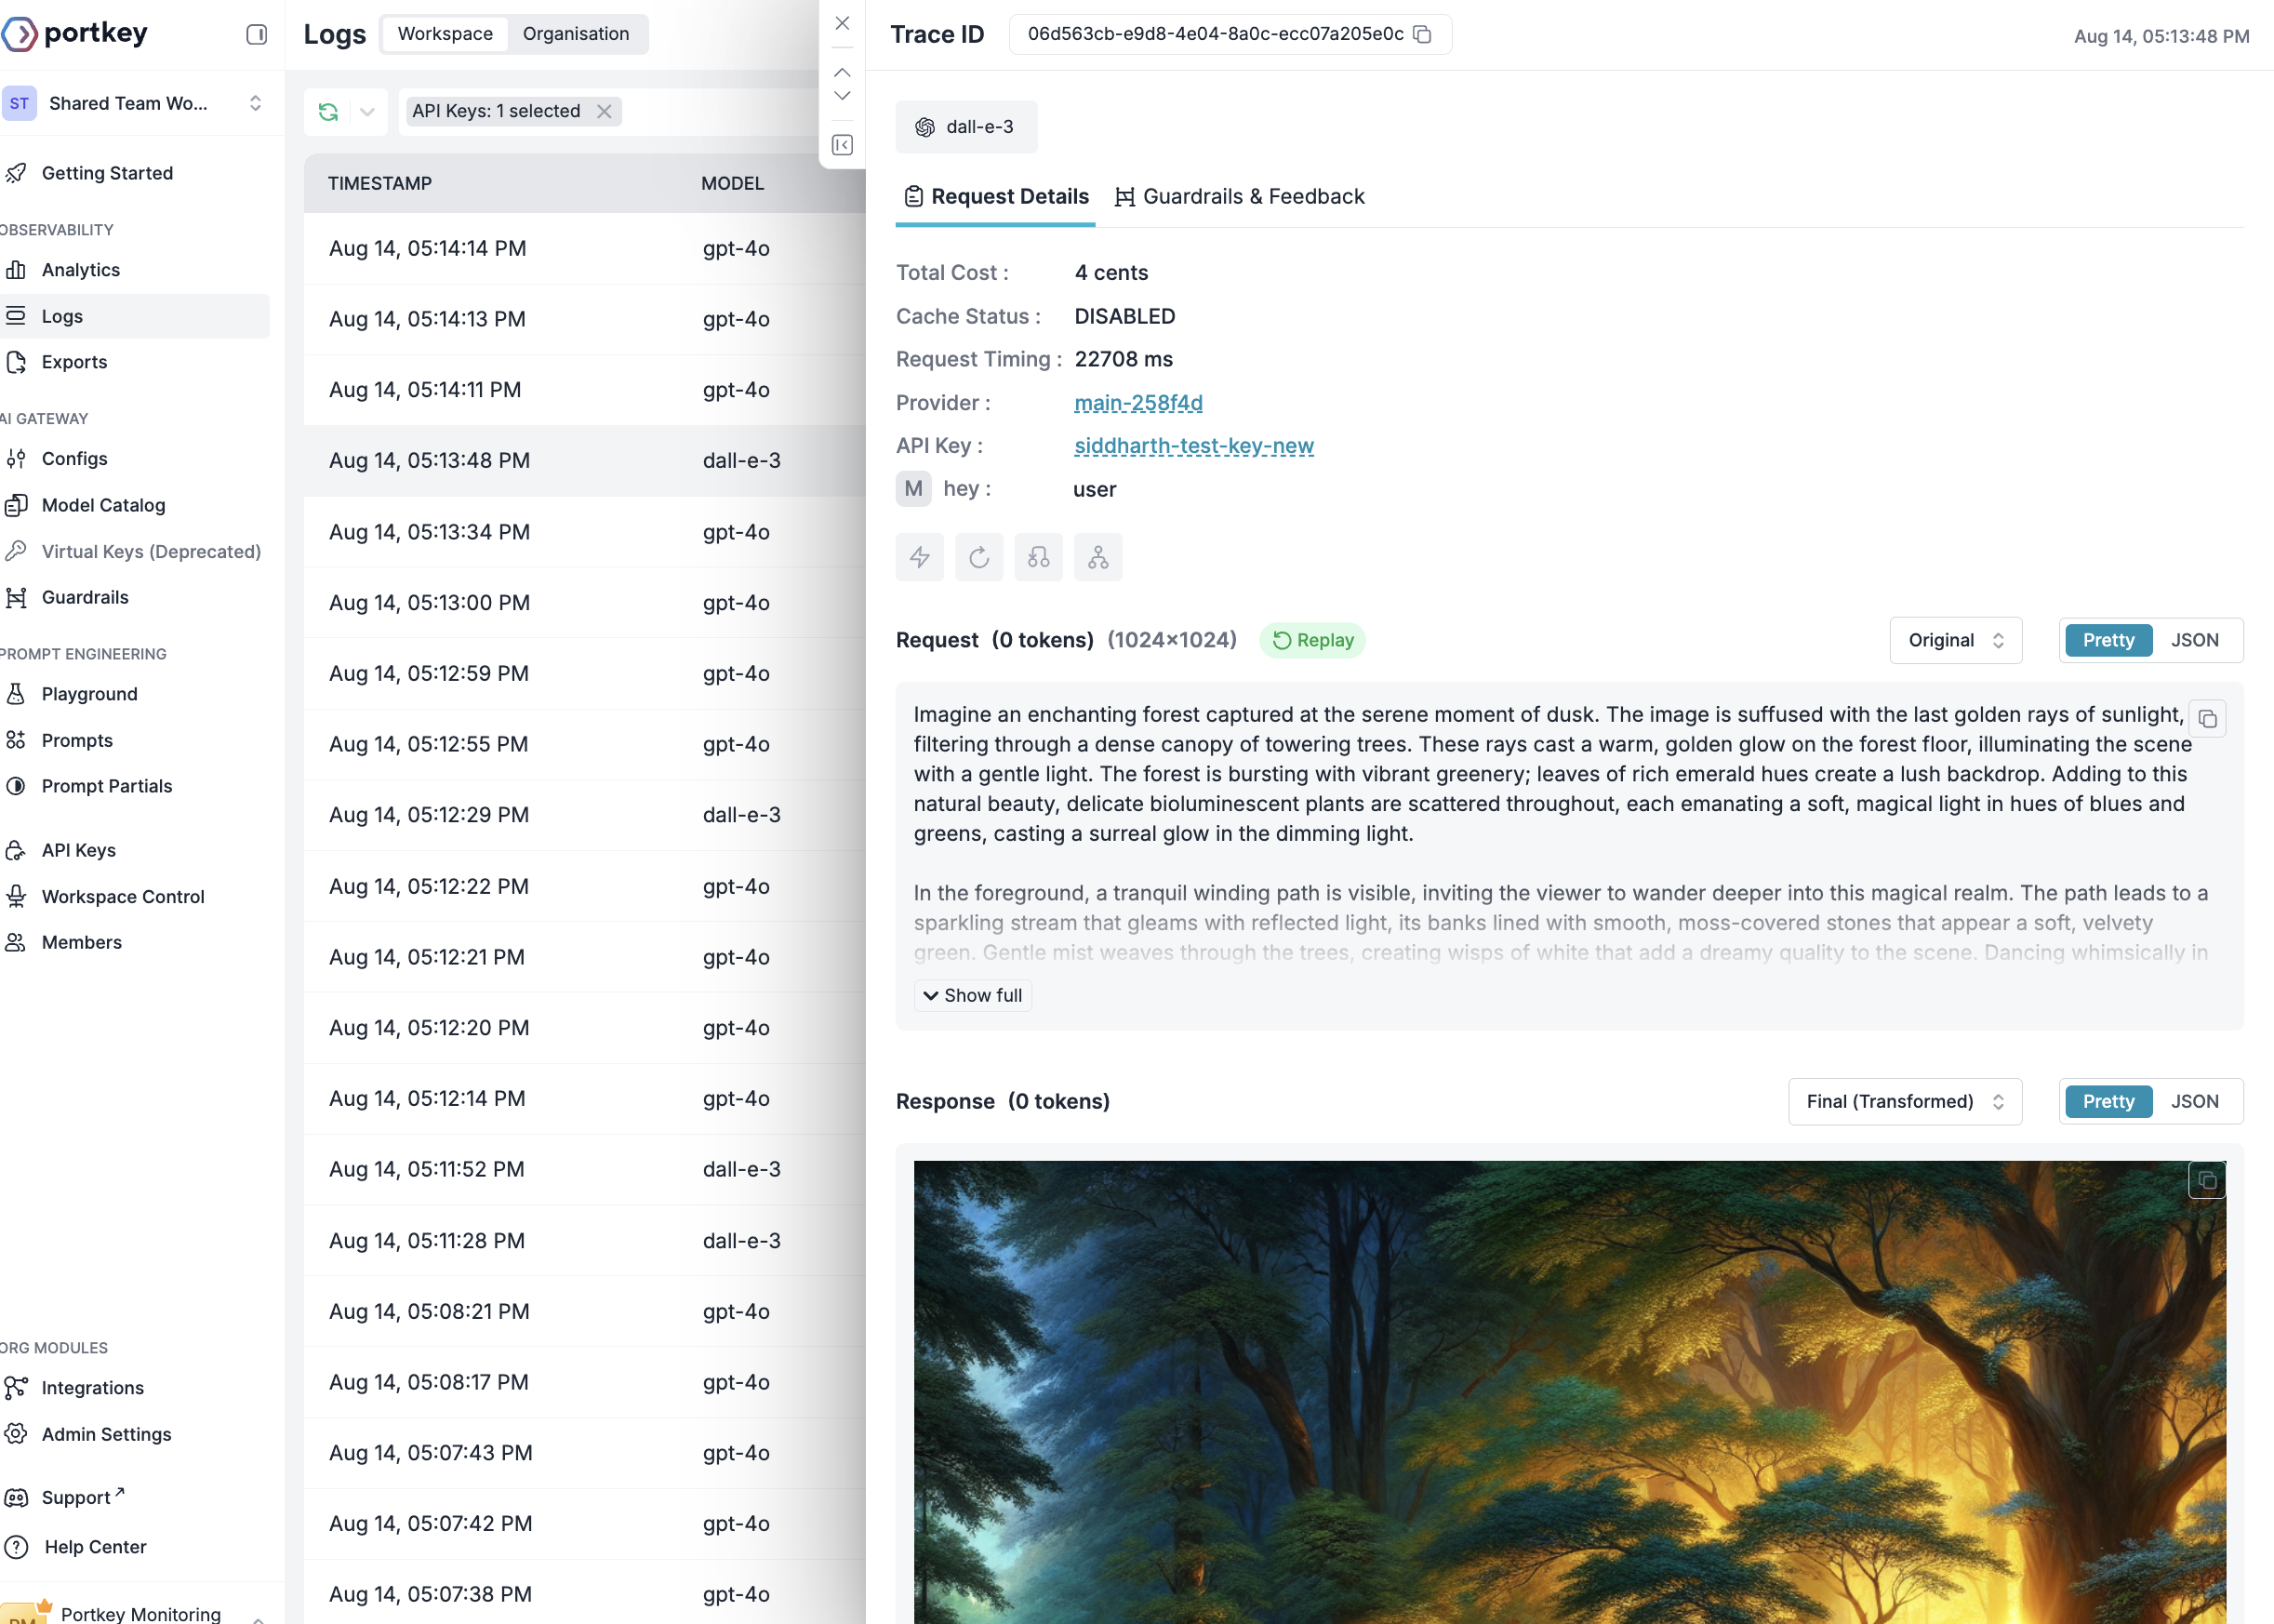
All image generation requests through Portkey are automatically tracked with:
* **Cost Attribution**: See exact costs per image generation
* **Request Logs**: Full prompt and response tracking
* **Performance Metrics**: Generation time and success rates
* **Metadata Tags**: Track image generation by team/department
In the Image Settings page, configure the following:
1. **Enable Image Generation**: Toggle ON the **Image Generation (Experimental)** option
2. **Image Generation Engine**: Select **Default (Open AI)** from the dropdown
3. **OpenAI API Config**: Enter Portkey's base URL:
```
https://api.portkey.ai/v1
```
4. **API Key**: Enter your Portkey API key (from [Step 1](#1-setting-up-portkey))
5. **Set Default Model**: Enter your model slug in the format:
```
@provider-key/model-name
```
For example: `@openai-test/dall-e-3`
Choose the model you wish to use. Note that image size options will depend on the selected model:
* DALL·E 2: Supports 256x256, 512x512, or 1024x1024 images.
* DALL·E 3: Supports 1024x1024, 1792x1024, or 1024x1792 images.
* GPT-Image-1: Supports auto, 1024x1024, 1536x1024, or 1024x1536 images.
**Steps**: Set the number of generation steps (typically 50 for good quality)
* **Other Models**: Check your provider's documentation (Gemini, Vertex, and others) for supported sizes.
1. Return to the main chat interface
2. Type a prompt and click the image generation icon
3. Your image will be generated using Portkey's infrastructure
4. Track usage and costs in the [Portkey Dashboard](https://app.portkey.ai/logs)
### Monitoring Image Generation
All image generation requests through Portkey are automatically tracked with:
* **Cost Attribution**: See exact costs per image generation
* **Request Logs**: Full prompt and response tracking
* **Performance Metrics**: Generation time and success rates
* **Metadata Tags**: Track image generation by team/department
 **Pro Tip**: If you are using a different AI provider (Gemini, Vertex AI, etc.) and need additional parameters for image generation, add them to a Portkey Config as `override_params` and attach it to your API key. Here's a [guide](/product/administration/enforce-default-config).
# Portkey Features
Now that you have an enterprise-grade OpenWebUI setup, explore the comprehensive features Portkey provides to ensure secure, efficient, and cost-effective AI operations.
### 1. Comprehensive Metrics
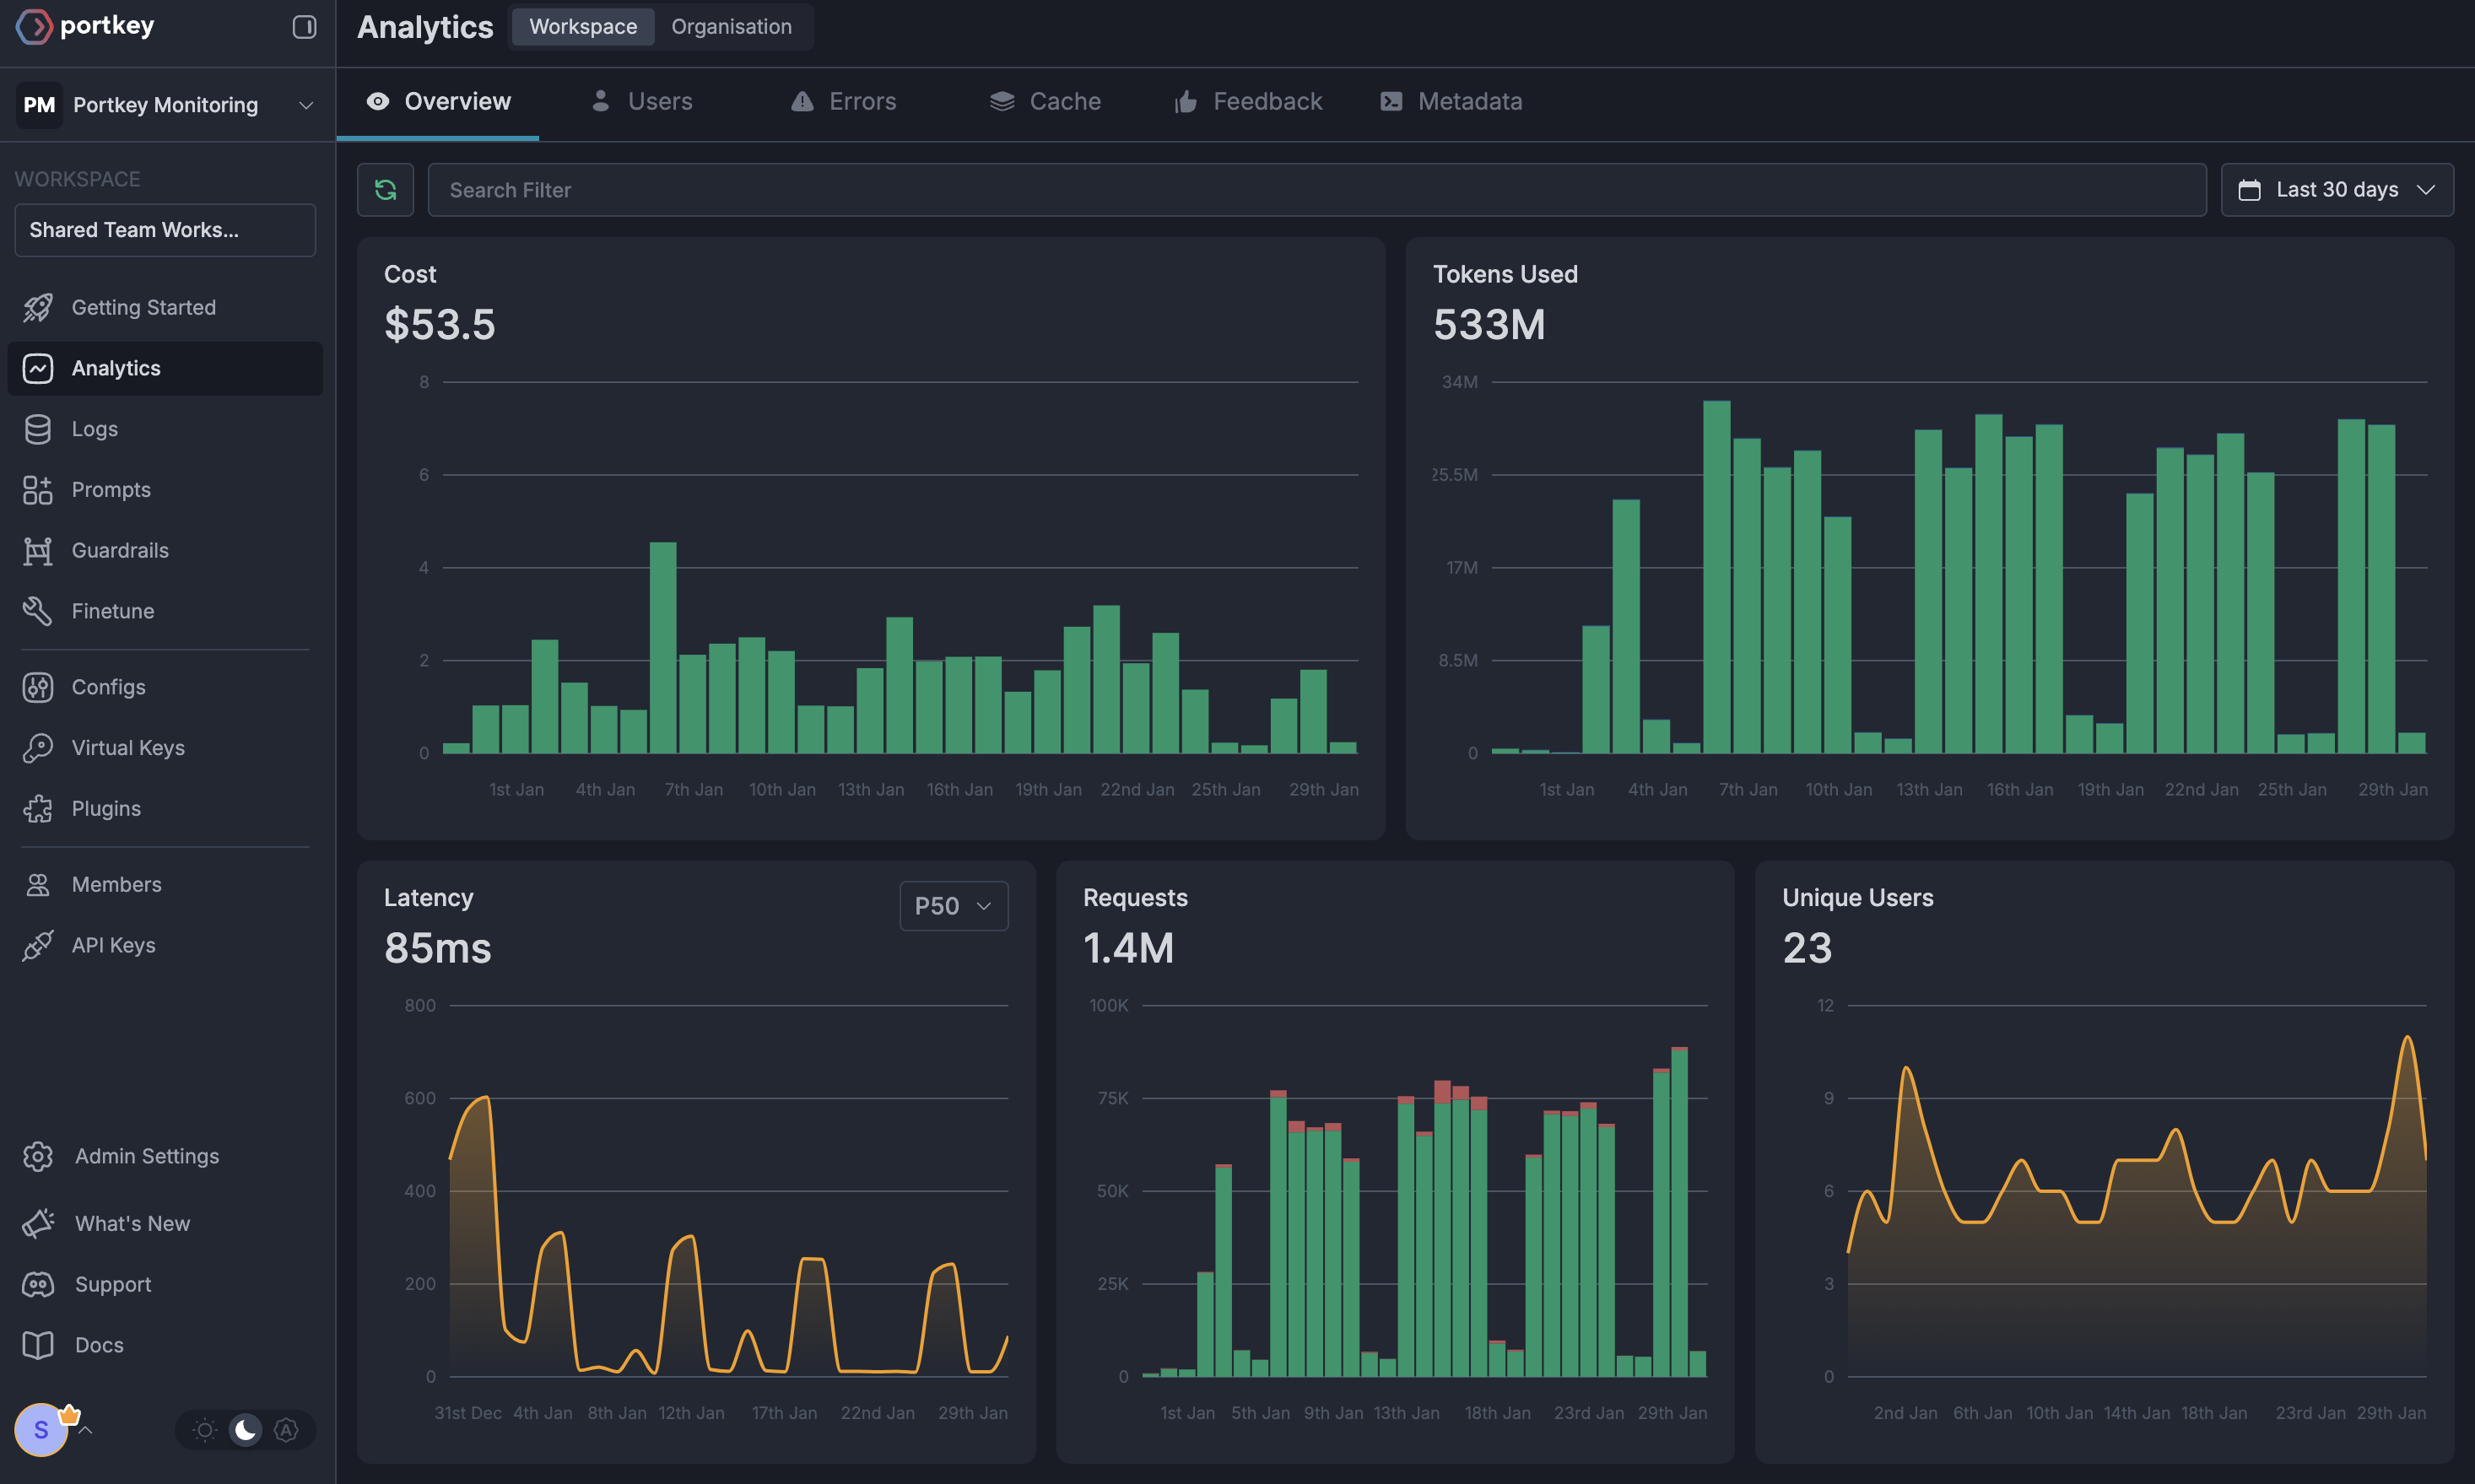
Using Portkey you can track 40+ key metrics including cost, token usage, response time, and performance across all your LLM providers in real time. You can also filter these metrics based on custom metadata that you can set in your configs. Learn more about metadata here.
**Pro Tip**: If you are using a different AI provider (Gemini, Vertex AI, etc.) and need additional parameters for image generation, add them to a Portkey Config as `override_params` and attach it to your API key. Here's a [guide](/product/administration/enforce-default-config).
# Portkey Features
Now that you have an enterprise-grade OpenWebUI setup, explore the comprehensive features Portkey provides to ensure secure, efficient, and cost-effective AI operations.
### 1. Comprehensive Metrics
Using Portkey you can track 40+ key metrics including cost, token usage, response time, and performance across all your LLM providers in real time. You can also filter these metrics based on custom metadata that you can set in your configs. Learn more about metadata here.
 ### 2. Advanced Logs
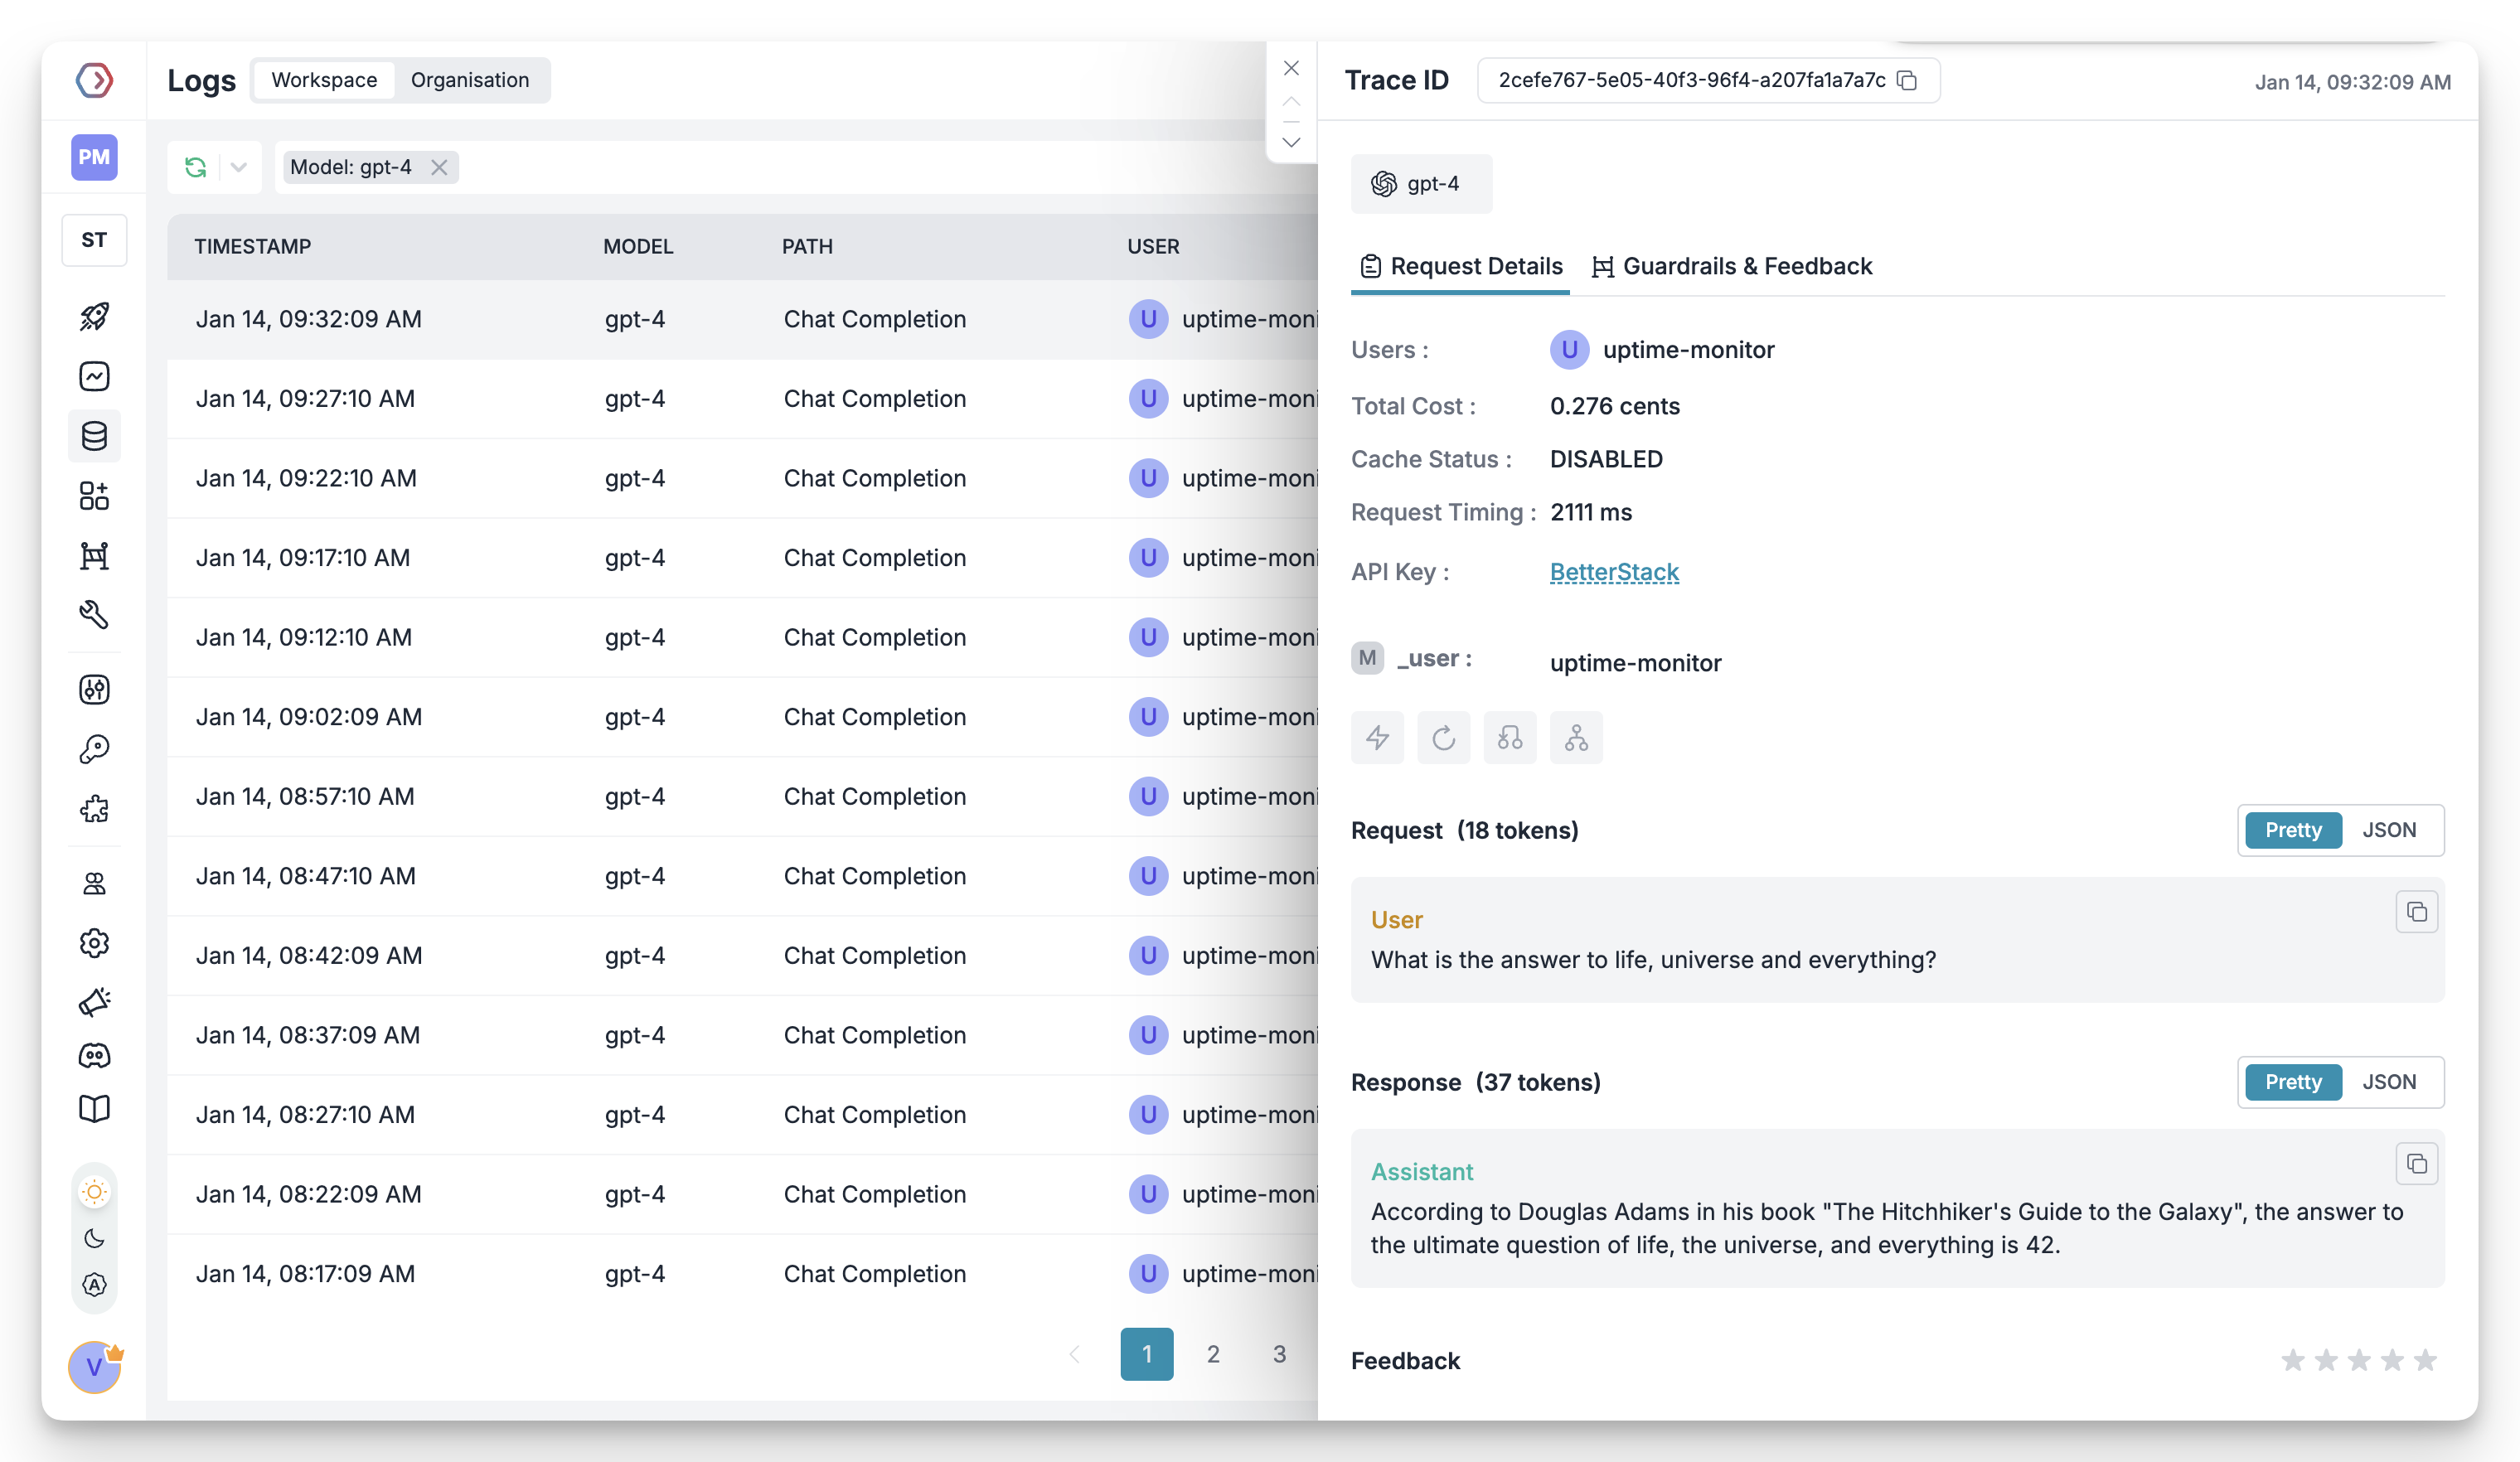
Portkey's logging dashboard provides detailed logs for every request made to your LLMs. These logs include:
* Complete request and response tracking
* Metadata tags for filtering
* Cost attribution and much more...
### 2. Advanced Logs
Portkey's logging dashboard provides detailed logs for every request made to your LLMs. These logs include:
* Complete request and response tracking
* Metadata tags for filtering
* Cost attribution and much more...
 ### 3. Unified Access to 1600+ LLMs
You can easily switch between 1600+ LLMs. Call various LLMs such as Anthropic, Gemini, Mistral, Azure OpenAI, Google Vertex AI, AWS Bedrock, and many more by simply changing the `model slug` in your default `config` object.
### 4. Advanced Metadata Tracking
Using Portkey, you can add custom metadata to your LLM requests for detailed tracking and analytics. Use metadata tags to filter logs, track usage, and attribute costs across departments and teams.
### 5. Enterprise Access Management
Set and manage spending limits across teams and departments. Control costs with granular budget limits and usage tracking.
Enterprise-grade SSO integration with support for SAML 2.0, Okta, Azure AD,
and custom providers for secure authentication.
Hierarchical organization structure with workspaces, teams, and role-based
access control for enterprise-scale deployments.
Comprehensive access control rules and detailed audit logging for security compliance and usage tracking.
### 6. Reliability Features
Automatically switch to backup targets if the primary target fails.
Route requests to different targets based on specified conditions.
Distribute requests across multiple targets based on defined weights.
Enable caching of responses to improve performance and reduce costs.
Automatic retry handling with exponential backoff for failed requests
Set and manage budget limits across teams and departments. Control costs
with granular budget limits and usage tracking.
### 7. Advanced Guardrails
Protect your Project's data and enhance reliability with real-time checks on LLM inputs and outputs. Leverage guardrails to:
* Prevent sensitive data leaks
* Enforce compliance with organizational policies
* PII detection and masking
* Content filtering
* Custom security rules
* Data compliance checks
Implement real-time protection for your LLM interactions with automatic
detection and filtering of sensitive content, PII, and custom security rules.
Enable comprehensive data protection while maintaining compliance with
organizational policies.
# FAQs
Yes! You can create multiple
[Integrations](https://app.portkey.ai/integrations) (one for each provider)
and attach them to a single config. This config can then be connected to
your API key, allowing you to use multiple providers through a single API
key.
Portkey provides several ways to track team costs: - Create separate
Integrations for each team - Use metadata tags in your configs - Set up
team-specific API keys - Monitor usage in the analytics dashboard
When a team reaches their budget limit: 1. Further requests will be blocked
2\. Team admins receive notifications 3. Usage statistics remain available in
dashboard 4. Limits can be adjusted if needed
# Next Steps
**Join our Community**
* [Discord Community](https://portkey.sh/discord-report)
* [GitHub Repository](https://github.com/Portkey-AI)
For enterprise support and custom features, contact our [enterprise
team](https://calendly.com/portkey-ai).
### 3. Unified Access to 1600+ LLMs
You can easily switch between 1600+ LLMs. Call various LLMs such as Anthropic, Gemini, Mistral, Azure OpenAI, Google Vertex AI, AWS Bedrock, and many more by simply changing the `model slug` in your default `config` object.
### 4. Advanced Metadata Tracking
Using Portkey, you can add custom metadata to your LLM requests for detailed tracking and analytics. Use metadata tags to filter logs, track usage, and attribute costs across departments and teams.
### 5. Enterprise Access Management
Set and manage spending limits across teams and departments. Control costs with granular budget limits and usage tracking.
Enterprise-grade SSO integration with support for SAML 2.0, Okta, Azure AD,
and custom providers for secure authentication.
Hierarchical organization structure with workspaces, teams, and role-based
access control for enterprise-scale deployments.
Comprehensive access control rules and detailed audit logging for security compliance and usage tracking.
### 6. Reliability Features
Automatically switch to backup targets if the primary target fails.
Route requests to different targets based on specified conditions.
Distribute requests across multiple targets based on defined weights.
Enable caching of responses to improve performance and reduce costs.
Automatic retry handling with exponential backoff for failed requests
Set and manage budget limits across teams and departments. Control costs
with granular budget limits and usage tracking.
### 7. Advanced Guardrails
Protect your Project's data and enhance reliability with real-time checks on LLM inputs and outputs. Leverage guardrails to:
* Prevent sensitive data leaks
* Enforce compliance with organizational policies
* PII detection and masking
* Content filtering
* Custom security rules
* Data compliance checks
Implement real-time protection for your LLM interactions with automatic
detection and filtering of sensitive content, PII, and custom security rules.
Enable comprehensive data protection while maintaining compliance with
organizational policies.
# FAQs
Yes! You can create multiple
[Integrations](https://app.portkey.ai/integrations) (one for each provider)
and attach them to a single config. This config can then be connected to
your API key, allowing you to use multiple providers through a single API
key.
Portkey provides several ways to track team costs: - Create separate
Integrations for each team - Use metadata tags in your configs - Set up
team-specific API keys - Monitor usage in the analytics dashboard
When a team reaches their budget limit: 1. Further requests will be blocked
2\. Team admins receive notifications 3. Usage statistics remain available in
dashboard 4. Limits can be adjusted if needed
# Next Steps
**Join our Community**
* [Discord Community](https://portkey.sh/discord-report)
* [GitHub Repository](https://github.com/Portkey-AI)
For enterprise support and custom features, contact our [enterprise
team](https://calendly.com/portkey-ai).